
Adventure Photography Lenses: A Complete Crash Course
Learn everything you need to know about lenses, including focal length, aperture, and a variety of features.
Prefer to watch this tutorial in video format? 😏
Introduction
In this tutorial I’m going to discuss everything you need to know about lenses. I’ll start by discussing what focal range and aperture is, and then teach you how to pick out a quality lens. Buckle up, because this tutorial contains a massive amount of information- and even though it involves intimidating looking numbers, it’s extremely easy to understand, I promise. By the time we’re done, you’re going to know everything you need to start picking out and using different lenses for adventure photography.
Focal Length
Right out of the gate, when you first pick up a lens, you’re gonna notice two numbers. The number with a “mm” at the end of it is the focal length of the lens. For example, you might see a lens that says “24-70mm.” The other number you’ll notice, usually accompanied by a “f/,” is the aperture (or f-stop) of the lens, which we’ll cover later in this tutorial.
A low focal length number, like 14mm, means that the lens can capture wider scenes. A high focal length, like 150mm, means the lens can capture more zoomed in scenes.
Across the focal length spectrum, there are six main ranges that I’m going to cover in detail. Each range is good for different types of photography. Let's start super wide and work our way up!
Fisheye (10mm and below)
The first range I want to cover is fisheye lenses, which are the widest of wide lenses. They are sized at anything 10mm and below, and they’re pretty niche in the photography community. Since they are so wide, they naturally come with a substantial amount of distortion on the edges- almost resembling a fish bowl.
If you’re going for a shot that looks funky, wacky, and even a little psychedelic, this is a great option. The skateboarding community has integrated this focal length into their style quite a bit.
Personally, I find them occasionally handy for capturing extremely cramped indoor spaces, but I prefer something in the ultra-wide (10-16mm) range because then I don’t have to worry about excessive distortion and its effect on straight lines.

This photo was taken at Catedral de Nuestra Señora Santa Ana, in El Salvador. It was taken on a 10mm, fisheye focal length, which the gave the birds a distortion that made them feel more immersive.
Ultra-Wide (10-16mm)
The next focal length range is ultra-wide lenses, which can be anything from 10-16mm in length. Again, this is a bit of a niche lens in the photography world, but far more popular than fisheye lenses. Personally I love to use this focal length for architecture, as the distortion isn’t bad, and it can easily be fixed in Photoshop.
Ultra-wide lenses are also great for Astrophotography. This is because they have the ability to capture most of the milky way in frame, eliminating the need for panoramic shots.
One of my favorite uses for ultra-wide lenses is Focus-Stacked shots, which is essentially a style of photography where you capture a small subject in the foreground, and a wide scene in the backdrop. You then combine the focus on the images in Photoshop to create something unique and eye-catching.

This photo was taken in a field in Last Chance, Colorado. It was taken on an ultra-wide lens at 12mm.
Wide (24-35mm)
Wide lenses are the next step up in the focal range, and include everything from 16-35mm. This is the most common range people use for wide angle shots.
It’s particularly important in the film world, because there’s no distortion on lenses to fix. I find this lens helpful for establishing shots, or images that show the general size of a scene.

This photo was taken on Redcloud Peak in Colorado. It was taken at a 24mm, wide angle focal length..
Mid-Range (35-70mm)
Mid-range lenses are the most commonly used focal range in adventure photography, simply because of the versatility. 35-70mm lenses allow you to capture scenes that are a little wide, but also zoomed in enough that you can focus on a solitary subject. This range of lenses is perfect for sessions where you might be shooting outdoor scenes, but also might be shooting portraits.
For lenses fixed at 50mm, you’ll often hear the phrase “Nifty-Fifty.” This is because 50mm lenses, with an aperture of f/1.8 or below, are widely considered to be the most well-rounded lens for all photography purposes.

This photo was taken at Isla Aguada, Mexico. It was taken at a mid-range, 48mm focal length.
Telephoto (70 -20mm)
From here, we start to get into the zoom lenses. The first range we are going to cover is 70-200mm, which are commonly known as telephoto lenses. This range is perfect for far-away landscapes, portraits, and product photography.
One phrase you might hear associated with these lenses is compressed landscapes. This means that the background of a shot (for example, a mountain) is taller than the subject in the front of the shot. These shots are often chosen because they can capture the size of background objects- whereas a wide angle lens would make the mountain look smaller.
I’d say this, a mid-range lens, and a wide angle lens are the three most important lenses to acquire in your setup, as you’ll be covered for most photography situations.

This photo was taken on Harrison Street in San Francisco. It was taken on a telephoto lens at 191mm, and is a great example of compression- i.e. the background (bridge) is larger than the foreground subject (boat.)
Super Telephoto (200mm and above)
The final focal length range I’d like to cover is lenses that are 200mm and above. Commonly known as super telephoto lenses, these lenses are great for Wildlife photography, and (very) distant landscapes. In general you won’t find lenses that go above 600mm, but they are out there if you have a purpose for them.
Super telephoto lenses are known to be extremely bulky and heavy, so I rarely use them in my photography. It just doesn’t make sense for me to go on a five mile hike with a lens that’s as big as my backpack in it. However, if you’re going one a one mile loop in a bird sanctuary, or are traveling in a Jeep on a safari in Africa, they could have their uses.
One tool I’ve found to be useful is something called a teleconverter. Some lenses, such as the Sony line, have these small magnifiers that you put in between the lens and the body to 1.5x or 2.0x the length. For example if you have a Sony 100-400mm F4.5-5.6 lens, and put a 2.0x teleconverter on it, your lens would now be 200-800mm. This could save you the weight of carrying around a super telephoto lens, at the cost of a small decrease in aperture and sharpness.

This photo was taken on Cadillac Mountain in Maine. It was taken on a super-telephoto lens at 295.7mm.
Aperture
Alright. Now that we’ve thoroughly covered focal length and all the ranges you will come across, let’s take a look at aperture. This is essentially the number on the side of the lens that has a “f/” attached to it. In the most basic terms possible, the aperture determines how much blur, or depth of focus, you are going to get in the background of your primary subject.
The lower the aperture number is, the more blur, or depth of focus, you are going to get in the background. For example, if you take a portrait of a person standing in the woods with an 85mm f/1.8 lens, the trees in the background will be fairly blurred out. On the other hand, if you take the same photo with an 85mm f/4 lens, you are going to get trees that are more clearly visible in the background.
Lenses with apertures in the f/1.4-2.8 range are generally good for portraits and product photography, because it allows for the subject to be clearly, and beautifully, separated from the backdrop. However, the one caveat of these lenses is that they are generally bulkier, more expensive, and have a single focal length (AKA- they are usually prime lenses. We’ll cover this in the next section.)
For adventure photography, I don’t find it particularly useful to have lenses with a lower aperture in my bag. Most outdoor and architecture scenes don’t require a large depth of focus, so it’s not worth the extra weight and price.

This photo was taken near the Milk Market in Denver, Colorado. It was taken on a Sony 50mm f/1.2 lens, which allowed for a shallow depth of focus (or for the background to get “blurred” out.)
Zoom vs. Prime
Now let’s talk about the differences between a zoom lens and a prime lens.
We’ll start with a zoom lens, which is exactly what it sounds like. It allows you to have multiple focal lengths on a single lens. For example, you might have a 24-70mm lens that allows you to adjust the lens to shoot anywhere in the 24-70mm range.
A prime lens, on the other hand, is the complete opposite. Prime lenses are stuck at a signal focal length, like 50mm, for example. Now you might be asking yourself “Why would I ever buy a prime lens, when I can get more options with a zoom lens?” The reason is that prime lenses generally have low apertures, like f/1.4 or f/1.8, while zoom lenses can usually only dip down to something like f/2.8 or f/4. Prime lenses are also usually built better, which means that they can produce sharper images.
It’s a game of give and take, which means you have to decide what works best for your setup. For adventure photography, it makes the most sense to me to have multiple zoom lenses in the bag, because that means less gear on hikes.

This photo was taken at Land’s End in Cabo San Lucas, Mexico. Since this adventure required some fairly intense climbing, I only brought one lens- the Sony 24-70mm f/4. Having a versatile zoom lens meant I had more options for photos.
Automatic vs. Manual
Now let’s talk about automatic vs. manual lenses. And no, we’re not talking about cars. It basically means does the lenses have autofocus, or do you have to manually adjust the focus yourself.
In today’s day and age, pretty much every modern lens has autofocus included, as it makes photography significantly easier. Having to manually adjust the lens for every scene in front of you can be a major time suck when the light (or animal) is quickly running out of frame.
I’d say the only reason you might be working with a manual focus lens is if you’re using vintage lenses that don’t have autofocus, or if you’re filming video where a manual focus system is needed.
One thing you’re going to quickly realize is that every lens has its own personality- and some people enjoy shooting with older lenses because they have a distinct look and feel to them.
Optical vs. Digital Zoom Lenses
Optical versus digital zoom lenses. What’s the difference?
Well, for one they are both zoom lenses. But optical zoom lenses are similar to telescopes in that they don’t lose quality when zoomed in. This means that if you’re shooting on a 100-400mm lens, you’ll get the same resolution at 100mm and at 400mm- something that’s extremely exciting for wildlife photographers.
On the other hand, digital zoom lenses simply decrease the resolution as they zoom in. Luckily, you won’t run across these types of lenses for APS-C and mirrorless cameras, because they mainly exist on cameras that have built-in lenses- like smartphones or small hand-held cameras.

This photo was taken at Factory Butte in Utah. Even though it was taken at 133mm, it was taken on an optical zoom lens, which means it maintains a full resolution.
Full-Frame vs. APS-C Lenses
The next thing you’re going to want to notice in your search for a lens is if it’s built for an APS-C or a full frame camera body. Although not inherently obvious, it’s an important detail to look out for in the description.
If you put a lens that’s built for APS-C on a full-frame camera, or vice-versa, there’s a chance the lens might not work, and even if it does, the focal length and aperture will be altered. It could come with heavy vignetting (blackness) on the edges, and might have trouble focusing.
I made this mistake early in my photography career because APS-C lenses are usually cheaper than full frame ones, so I thought I was getting a great deal on a full-frame lens. Little did I know that it was actually an APS-C lens, so it had vignetting along the edges and wasn’t the correct focal length.
I swiftly returned it and never made that mistake again. Read the descriptions!
Brand vs. Third Party Lenses
One final thing to look out for with lenses is branded vs. third party lenses. By this I mean lenses that are made by the same company that made your camera body, and lenses that are made by a third party. For example, Sony has an entire line of lenses made for Sony cameras, but you can also buy lenses made by companies like Sigma, Tamron, and Zeiss that work on Sony cameras.
In general, I’d say lenses made by the brand of your camera are usually going to be the highest quality (and most expensive) lenses you can buy. But this doesn’t mean you should always get them. Plenty of competitive lenses, particularly in companies like Zeiss, can be just as good, and often significantly cheaper.
As I stated earlier, it’s all about reading the reviews and determining which ones are comparable for the price. If you’re on a budget, the time invested will be worth it.
If you have friends that are into photography as well, I personally think it’s worth it to invest in the same brand. That way, if you want to switch or borrow lenses for a particular shoot, you know someone. You can also plan your setups so that they compliment each other with variety.
Many companies offer converters for their lenses (for example, a converter that allows Sony lenses on a Canon camera,) but more often than not you’ll lose the ability to autofocus, and the sharpness will be drastically reduced.

This photo was taken at Chatfield Farms in Colorado. It is an example of a tack sharp image taken on a high quality, third party Zeiss lens. (Zeiss 24-70mm f/4)
Lens Quality
Now that you understand what types of lenses there are, let’s get into lens quality. In this section, I’ll cover the primary factors that determine if a lens is inherently “good” or “bad.” Thoroughly reading reviews and looking at sample photos is the easiest way to navigate this minefield without investing too much time or money.
If you’re completely new to photography, realize that none of the following factors are that important to taking a good photo. What matters most is how solid your composition is. The lens quality is simply the icing on the cake of an already good photo.
If you want to speed run the lens search process, simply seek out brand-name lenses that have a high amount of five star reviews. Diving into the technicalities too early can easily become an overwhelming experience.
Sharpness
The first, and arguably the most important thing in any lens is how sharp the lens is. In other words, how crispy and clear the image is. A lens that isn’t sharp will look slightly out of focus, no matter how in focus it actually is. It might also contain more grain (visual fuzz,) or muddy (fusing) colors.
But also, let’s be real for a second. Unless you’re blowing your images up for prints, or are actively zooming in on every photo (AKA- “pixel peeping,”) 99% of people won’t notice major differences in sharpness. Don’t make the mistake of getting too into the weeds here, like so many new photographers do. Simply make sure the lens sharpness is “good”- it’s usually not worth an extra grand for the small increase to “great.”
One thing to note is that every lens has a different aperture where the sharpness is best, although it’s usually in the f/8 - f/13 range. Lenses are also sharpest in the center, and get less sharp in the outskirts.

This photo was taken at Eilean Donan Castle in Scotland. Notice the clean sharpness it is in the castle and the foreground rock.
Weatherproofed
Although I talked about the importance of weather-proofed equipment in the Gear tutorial, it’s worth reiterating it here. Ensuring that your lens is weather-sealed against rain, snow, sand, and dust can be a life-saver. Especially because the lens attaches to the sensor of the camera, which is the most sensitive part of the whole operation.
Make the investment for peace of mind, and the ability to shoot in more dramatic situations.
Bokeh
Bokeh is one of those words you’ve probably never heard in your life unless you’ve talked to a photographer. It’s essentially those little light balls that exist in the background of a photo when you shoot with a low aperture. Plenty of editing apps these days will allow you to “fake it” in the background with AI, but it can be easily achieved in-camera if you know what you’re doing.
They appear most often when you shoot below f/4 and have small illuminated objects in the background of a shot, like holiday lights, illuminated leaves, or water droplets.
Every lens is going to have a slightly different style of bokeh, none of which are subjectively better than any other. It’s all a matter of preference- do you like your bokeh silky smooth, more twirly, or more rough around the edges?

This photo was taken to demonstrate what bokeh is. It was taken at 70mm, at an f/4 aperture with holiday lights in the background.
Chromatic Aberration
The next couple of quality traits I’m going to show you can easily be fixed in Photoshop or Lightroom, so they’re not a huge deal-breaker on your search. But they’re worth mentioning so that you know what people are talking about if you hear the terms tossed around.
The first term is chromatic aberration which sounds extremely technical, but it’s not. It’s essentially the distortion of color in a lens. If you look at a lens that has bad chromatic aberration, you’ll notice that along fine lines, (like tree branches or rock edges,) the color will almost look “3D.” As in, there’s a rainbow-like edge that appears. It can manifest itself in various color schemes, sometimes being red/blue, sometimes being blue/orange, sometimes all of the above.
Plenty of lower quality (~$500 and under) lenses will exhibit this quality when faced with high Dynamic Range scenes, but it’s literally a one click fix in Lightroom/Photoshop, so I wouldn’t worry about it too much.
Distortion/Vignetting
Another quality trait that’s worth mentioning is the lenses’ distortion and vignetting. Now each of these is a separate thing, but they generally occur in the same place- the outskirts of a low-quality wide angle lens.
Distortion occurs when the lens starts to stretch on the edges. It’s most notable in portraits where the body gets pulled on the outskirts of the frame, and in architecture where lines will be curved instead of straight. Luckily, it’s a one-click fix in Lightroom / Photoshop for most cases (not fisheye levels) of distortion.
Vignetting on the other hand, is a darkness that begins to appear on the edges of a frame. Personally, I add vignetting to almost all of my shots in post-processing, so I don’t mind a little upfront. But if you’re not into the look, it’s also an easy fix in Lightroom / Photoshop.
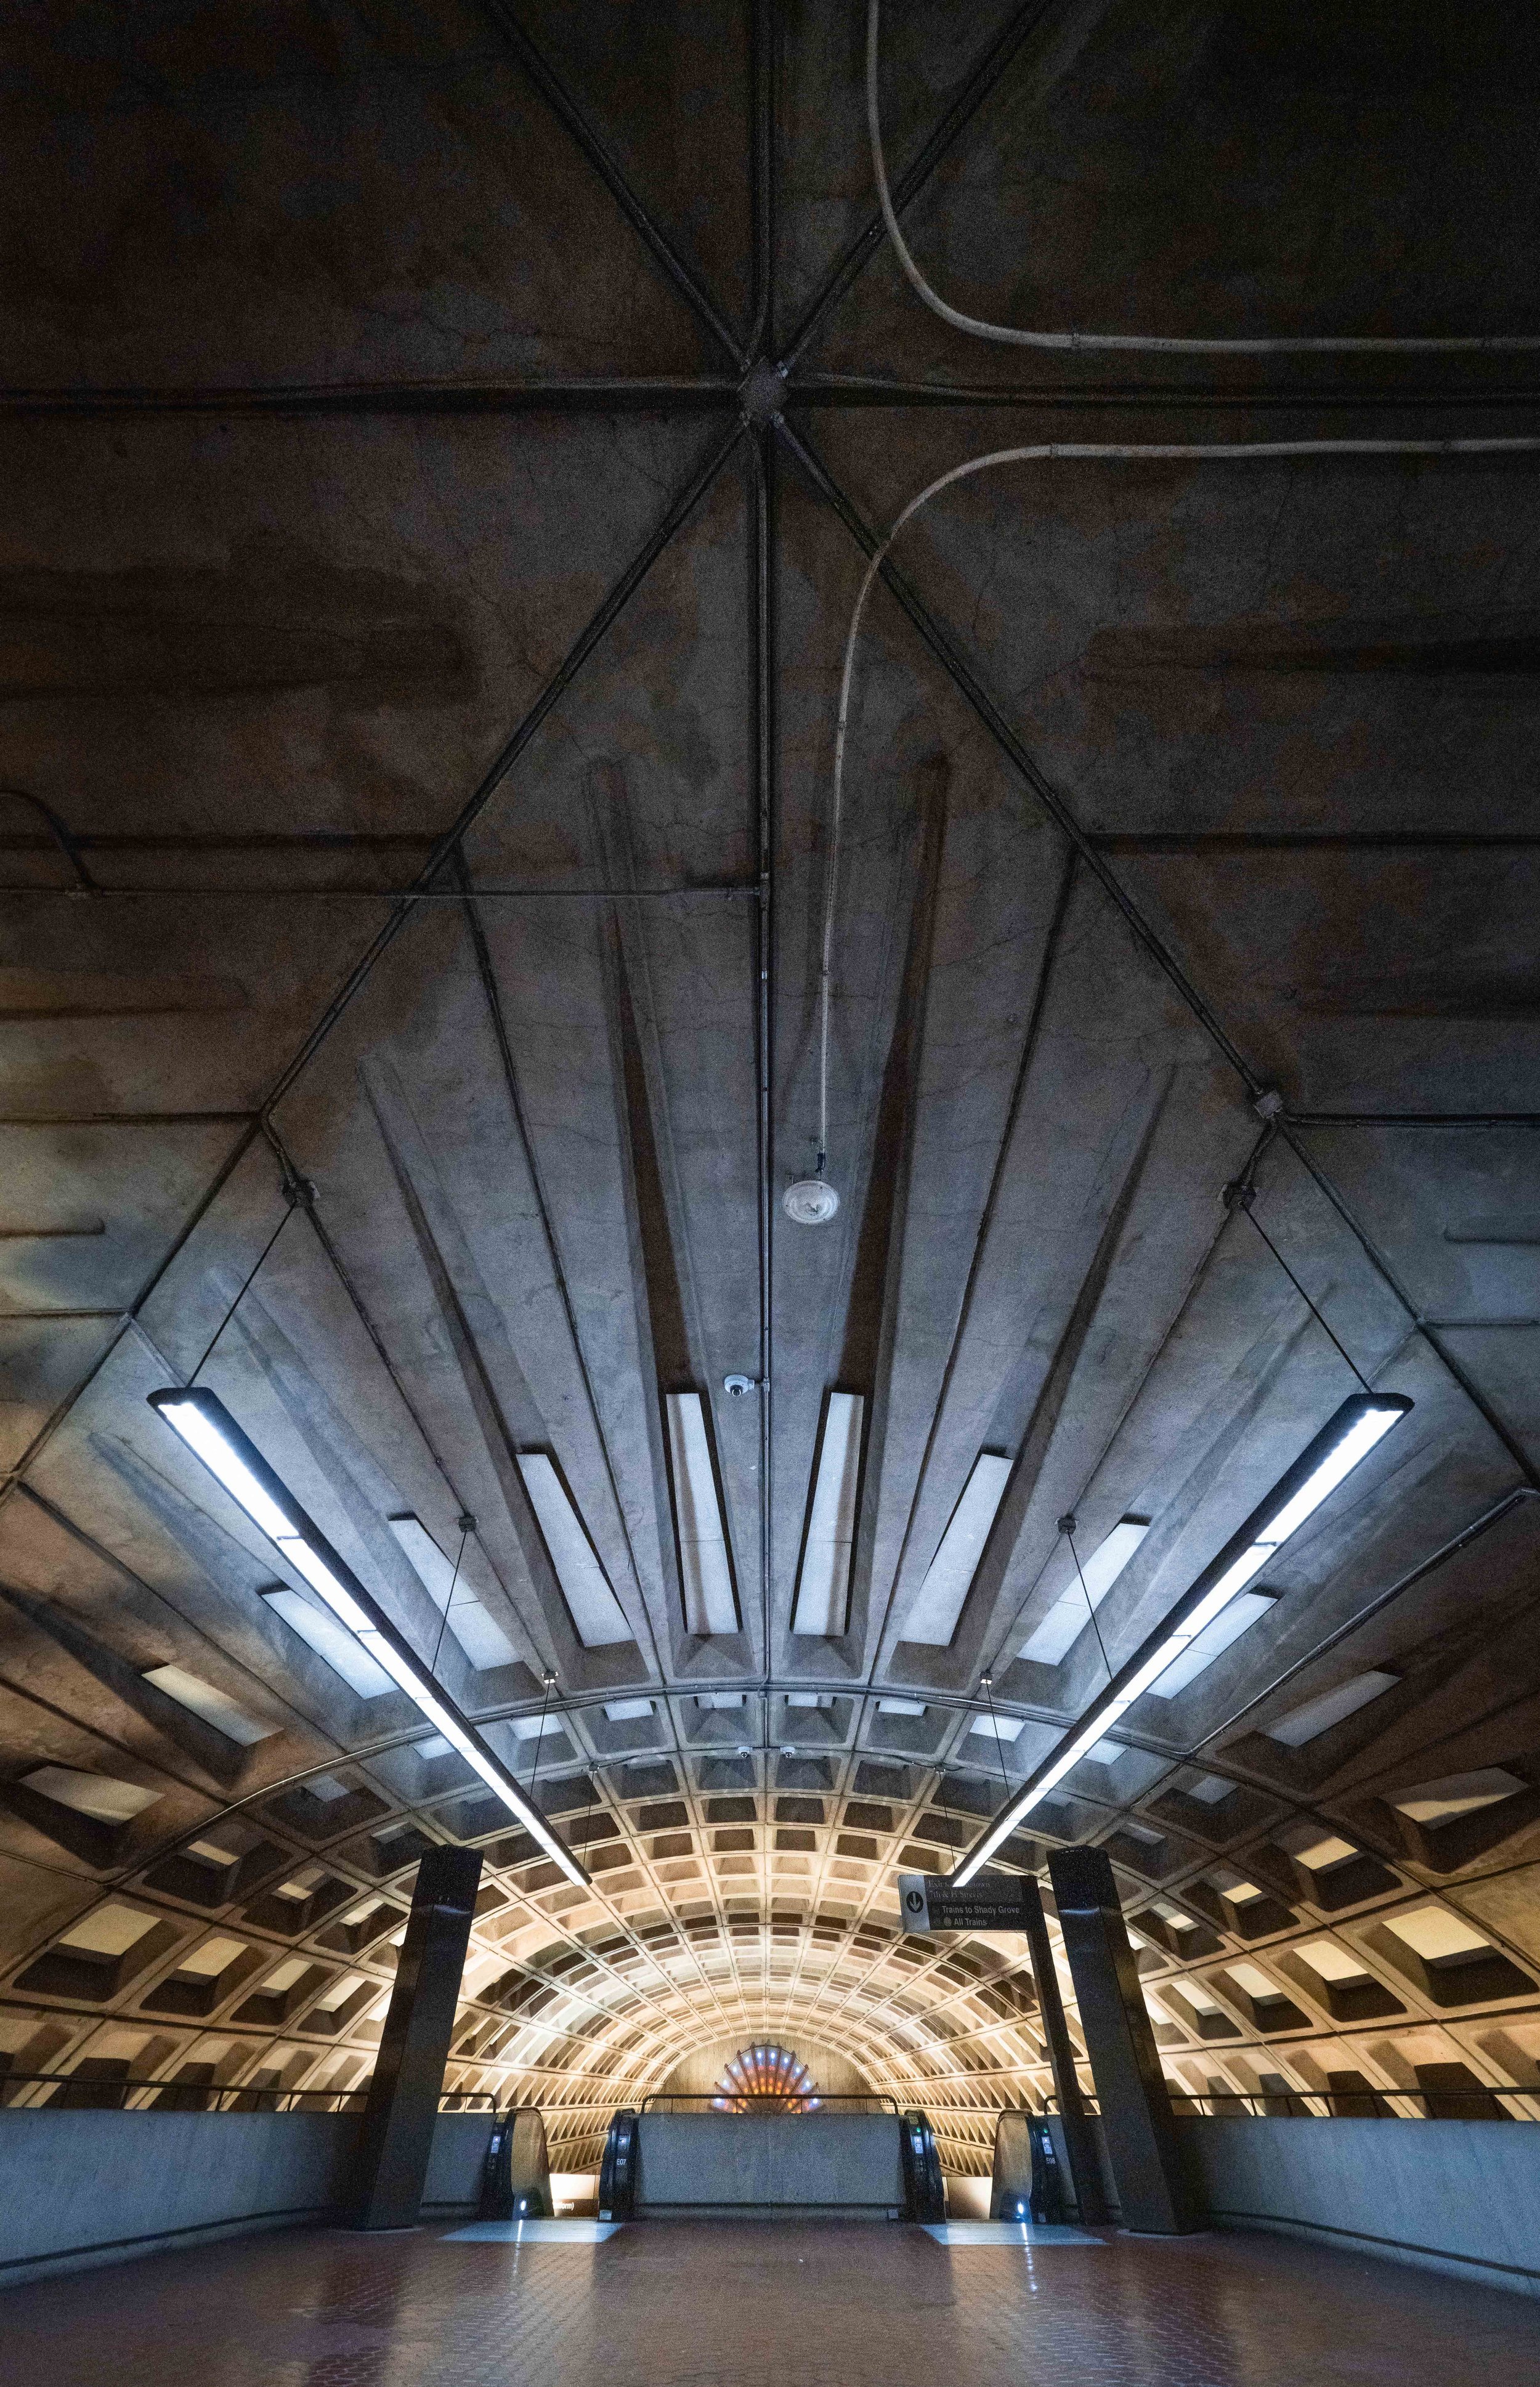
This image, taken in at the Gallery Place Metro stop in Washington, DC. It features significant vignetting and distortion, but in a way that adds to the scene.
Kit Lens
One last term you might see tossed around is kit lens. This basically translates to “starter zoom lens.” Lots of stores do deals where you can buy a camera body that comes with a kit lens, because it saves the trouble of having to look for a starter lens.
They usually have extremely big focal ranges, like 18-200mm for example, to give the photographer room to experiment with different styles of photography. In turn, this means the aperture is usually fluid- like f/3.5-6.3. This means that at 18mm you'll be able to get down to f/3.5, and at 200mm you’ll be able to get down to f/6.3. It transitions somewhere in the middle of that.
These lenses can be a great idea if you want to get shooting as fast as possible, as they’re usually decent quality, cheap, and can function in most situations.
My Recommendation
Phew. You made it. Now, with all that being said, what’s my personal recommendation for lenses?
I’d suggest trying to cover as much focal length as possible, in as small, high-quality, and affordable of a setup as possible. For every brand that’s going to be different, and if that means starting off with a single kit lens like the Sony 18-200mm f/3.5-6.3, so be it. But being fairly deep into my photography career, I’ve settled on a trio setup:
That’s only two extra lenses to carry in my camera bag on adventures, covering the focal range of 12-400mm. It’s minimalism at its finest, and covers pretty much every situation possible- from wide-angle interiors to distance animals. If you’re primarily shooting the outdoors and architecture, you don’t need lenses that drop below f/4.
However if I am in need of a low aperture, like for portrait or product shots, I have couple small prime lenses I can throw in the bag:
Sigma 55 f/1.4 (APS-C Lens that acts like an 85mm f/1.8 lens on a Full-Frame lens)
Conclusion
That’s everything I know about lenses. I hope you learned something, because this was an absurdly long article to type up. Don’t be afraid to come back and digest it in pieces if you need to sit on it, or come back to certain concepts.
You’ll understand it all before long!
Now let’s jump to my next tutorial, where I dive into the various types of Filters you can put on your lens.