
Dynamic Range Explained
Learn what dynamic range is and how to measure it in your camera.
Prefer to watch this tutorial in video format? 😏
Introduction
Now that we have our Image Quality settings dialed in, I’m going to introduce the concept of dynamic range. You may have heard me mention it a couple times now, but now we’re going to do a deep dive into it.
You’ll learn what dynamic range is specifically, and I’m going to share a few tools you can use to measure it while you’re out in the field. With that being said, let’s start from the top.
What Is Dynamic Range?
Dynamic range is essentially the range that your camera has to capture details in a scene. More specifically, it’s how much detail it can capture in the shadows and the highlights.
A camera with good dynamic range can pull out more detail in dark areas and perform better in low-light situations, while also preserving highlights (like the sky) correctly. On the other hand, a camera with poor dynamic range, like a cellphone or a camera with a low-quality sensor, won’t be able to capture details in the darkest and brightest areas of an image.
If a camera isn’t able to capture the details in these areas, the result is either pure white or pure black. Photographers generally refer to these areas as “clipped” or “blown-out.”

This image, although visually striking, has clipped shadows- many parts of the image are pure black.

Here’s the same image, with less clipped shadows. Notice how it adds more subtle detail to the image, without taking away from it’s creepiness.
Interestingly, the eyes are often drawn to these areas because pure black and white are such strong visual elements. But unless you’re doing it intentionally or it’s unavoidable, you generally want to avoid clipping. It can be distracting to viewers, and to other photographers, it implies that you don’t know how to Expose your camera correctly.
Here’s an example of an image with blown-out highlights. Notice how your eyes are drawn to the sky almost immediately.

Now here’s the same image, with a properly exposed sky. More detail is preserved, and the photo appears more tranquil.
When “Clipping” Is Acceptable
As I mentioned, there are some scenarios where clipping can’t be avoided. For example, if you’re shooting directly into the sun, the sun itself will likely be blown out. That’s okay. What’s important is learning how to Expose the surrounding areas so they don’t also get blown out.

This photo was taken at Morton Peak in California. Since it was shot directly into the sun, it’s blown-out. But there’s no way around that, and it’s exposed as much as possible apart from that, so it’s artistically viable.
There are also artistic reasons for intentional clipping. A popular portrait style involves shooting into the sun, using a flash to light your subject, and allowing the sky behind them to blow out completely. This creates a clean, minimal background that helps focus attention on the person.
On the other end of the spectrum, you might intentionally clip shadows in certain situations, like if you’re darkening a background to emphasize a subject. But again, these choices should be intentional and not the result of a poor exposure.

This photo was taken at a Day of the Dead festival in La Paz, Mexico- a small town at the end of Baja California. Clipping shadows was an intentional decision to isolate the subject in darkness.
As a general rule of thumb, unless you’re going for a very specific effect or are aiming directly at the sun, try your best to avoid clipping the highlights and shadows.
Tools to Measure Dynamic Range
Lets cover a few tools that you can use in your camera to measure your dynamic range. This will help you ensure that you’re not clipping your highlights or shadows.
1. Zebra Stripes
The first tool you can use is called zebra stripes. Found in many mirrorless cameras, this feature projects diagonal stripes over areas of the image that are close to being blown out. It’s a great way to spot areas that might be trouble before you press the shutter button. Search for “zebra stripes” or “marching ants” in your camera’s menu settings.
2. Histogram
The second tool you can use is called the histogram. At first glance, this graph will look intimidating. And to be completely honest, I avoided it entirely for the first couple years of my photography career. But one day someone explained it to me in very simple terms, and I learned how useful it actually is.
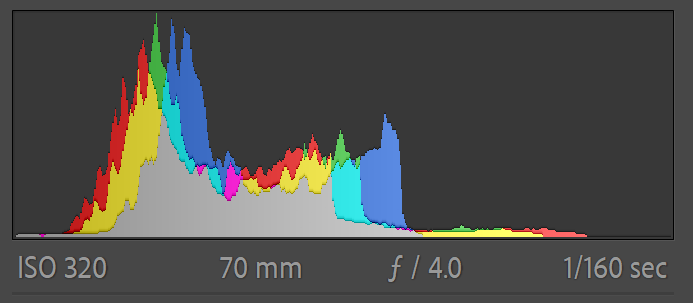
This is what a histogram looks like. Intimidating, eh?
Here’s how it works:
The horizontal axis shows brightness values, with blacks on the left and whites on the right.
The vertical axis shows how many pixels fall into each brightness level.
The middle area represents your midtones (gray values).
If the graph is heavily skewed to the left, your image may be underexposed, possibly clipping shadows. If it’s skewed to the right, you might be blowing out highlights.

A histogram like this means your image has clipped shadows.
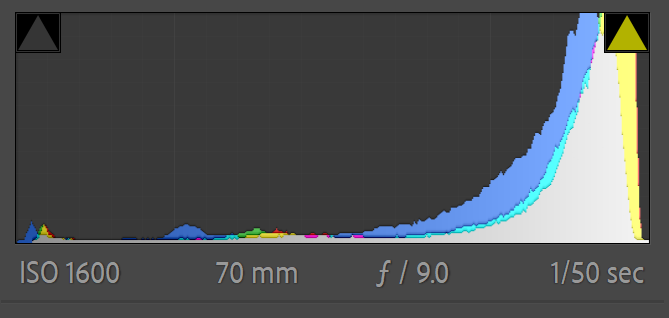
A histogram like this means your image has blown out highlights.
Ideally, your histogram should show most of the pixel information concentrated in the middle, tapering off toward the edges, like a soft pyramid. But no two images are the same, and you shouldn’t aim for a perfect pyramid every time. The goal is simply to avoid too many pixels stacked up at either end.

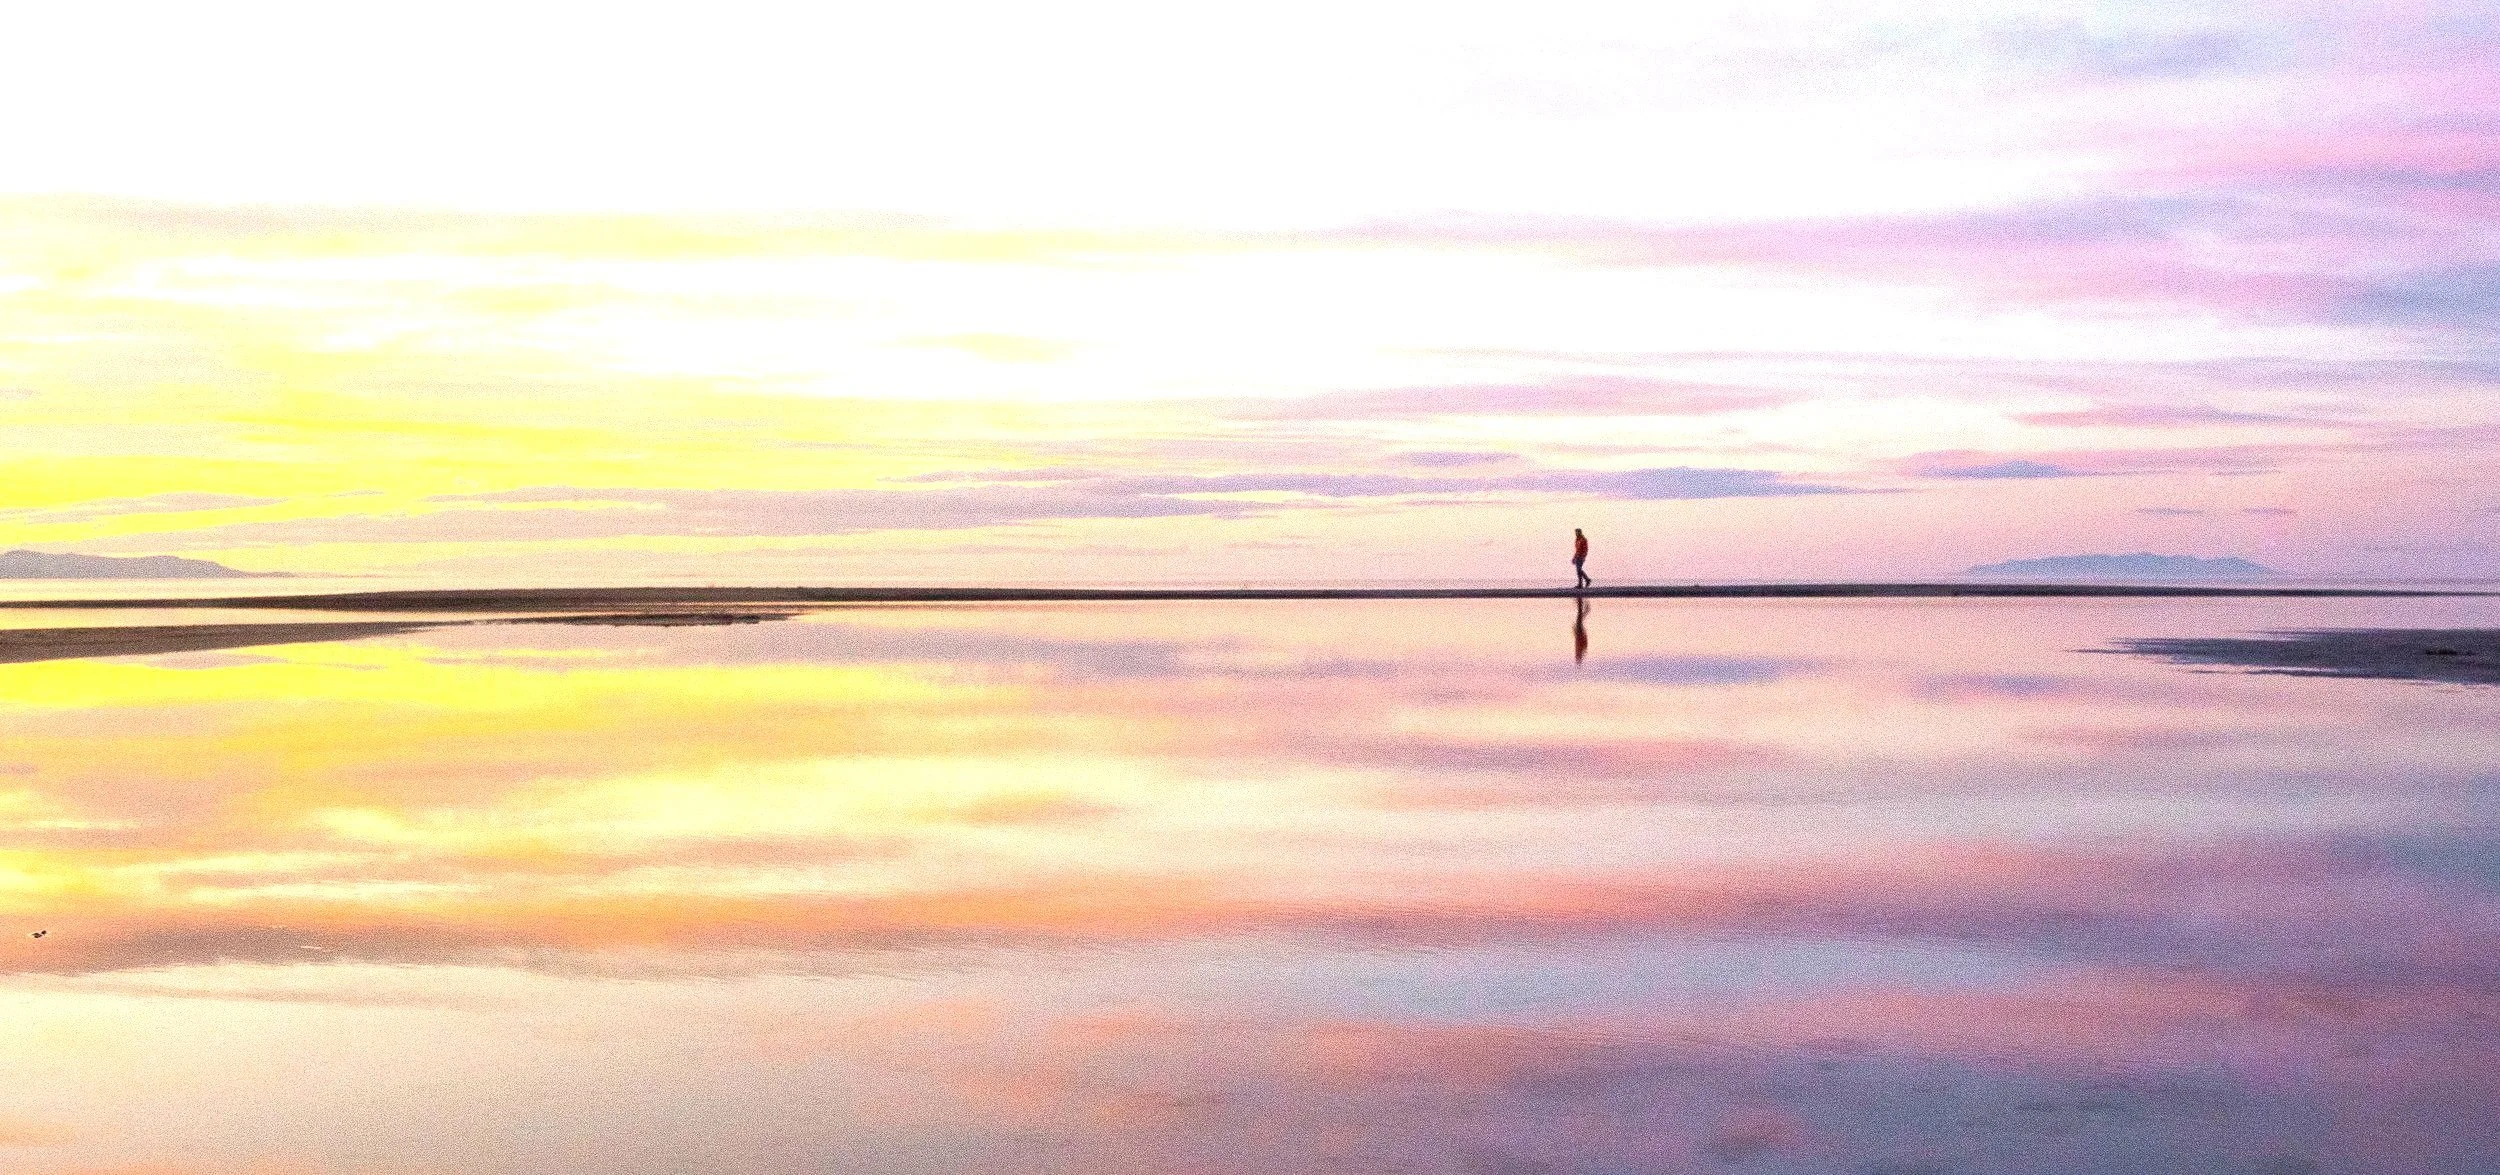
This is an example of a properly exposed histogram- meaning your image doesn’t have blown-out highlights or clipped shadows.
Many cameras allow you to display a live histogram on your screen, which helps you adjust exposure before taking the shot. This feature is invaluable, and I keep mine visible pretty much all the time.
Even better, histograms are available in editing programs like Lightroom and Photoshop, so you can evaluate exposure during post-processing as well.
How to Increase Dynamic Range
Now the obvious answer here is to get a better camera. But that’s not always feasible, and there’s a few tricks you can learn to increase your range on a lower-end camera.
Gradient ND Filters
Gradient ND Filters are essentially Filters that you put over your lens to expose the top or bottom half of your image better. For example, the top half of the ND filter might be darker to allow you to expose the sky with the foreground properly. These are great, but only work in instances where you have a flat horizon.

This photo was taken at China Camp in San Francisco. Notice how the foreground and the sky are both exposed properly. A Gradient ND Filter might be helpful here if your camera can’t expose both parts properly.
Exposure Blending
Exposure Blending is when you take two different images at different exposures, and blend them together in Photoshop. For example, if the sky’s blown out when your foreground is exposed correctly, you can take one photo of the sky exposed properly, and combine it with the image of the foreground exposed correctly. Now your entire image is properly exposed!
This is an advanced technique that we’ll be covering later in this course, but you should be aware right now that it is possible, and fairly easy at that. However, keep in mind that you need a tripod in order to utilize this technique, along with some decent Photoshop skills!

This photo, taken at Butler Wash in Utah, required an exposure blend to ensure both the ground and the sky were exposed properly.
Prioritize Highlights
If you’re left with a decision where you have to pick between exposing for the highlights or the shadows, choose to expose for the highlights. You’ll often be surprised how much information that shadows can retain as opposed to the highlights. The human eye is also attracted to light, so ensuring that your highlights look good should always be the priority over clipping the shadows.
Wrapping Up: Why Dynamic Range Matters
Why does this all matter? Well, it’s important to understand the dynamic range capabilities of your camera (or prospective camera,) so that you can ensure you’re creating images with the highest amount of detail possible. Using tools like zebra stripes and the histogram, you can make sure you’re avoiding blown-out highlights or shadows.
Although it might not seem that important right now, the more cameras you work with, the more you’ll begin to appreciate cameras with a higher dynamic range. You’ll be able to shoot in more low or high light situations without having to use advanced editing techniques like exposure blending.
In the next tutorial, I’ll go over the specific tools within your camera that help you Expose your images correctly. Let’s jump in!