
How to Expose Images Properly
Learn how to balance shutter speed, aperture, and ISO to get the perfect exposure.
Prefer to watch this tutorial in video format? 😏
Introduction: Understanding Exposure
In this tutorial, I’m going to be talking about exposure. Now that we properly understand what Dynamic Range is and how to measure it within your camera, I’m going to walk you through how to properly expose an image.
We’re going to work with the three main tools in your camera: shutter speed, aperture, and ISO. More importantly, I’ll show you how they all work together so you can keep them in perfect balance and ensure your shots are exposed exactly how you want them.
To effectively work with shutter speed, aperture, and ISO, we’ll be using manual mode on the camera. I know manual mode can seem intimidating, especially early on, but my goal is to teach you how to use it now so that after a few weeks or months of shooting, it becomes second nature.
Personally, I shoot about 95% of the time in manual mode. The only times I don’t are when things are happening quickly, like during sports, wildlife, or street photography. In those cases, I’ll switch to shutter priority, aperture priority, or even auto mode. (We’ll cover these modes in the Additional Settings tutorial.) For now, we’re going to focus entirely on learning manual mode.

This photo, taken at Cadillac Ranch in Texas, was taken at 1/125s ~ f/13 ~ ISO 400. In this tutorial, we’re going to break down what each of those numbers mean.
The Exposure Triangle: Shutter Speed, Aperture, ISO
Shutter speed, aperture, and ISO make up everything you do within your camera. Let’s break down each one of these components individually before we learn how they work together to expose an image.
Shutter Speed
Shutter speed is the easiest of these components to understand. Essentially, it controls the amount of motion blur in your image.
The shutter is the part of your camera that opens and closes when you press the shutter button. The shutter speed determines how long it stays open to let light in. For example, a shutter speed of 1/30th means it’s open for 1/30th of a second.
High-end cameras can often go up to 1/8000th of a second, to take extremely speed shots. On the opposite side of the spectrum, you can keep your shutter open for extended periods- like for 30 seconds, or even for hours at a time using an intervalometer tool.
Why change shutter speed, might you ask? Well, a fast shutter speed (like 1/2000th of a second) can freeze action, such as water droplets in mid-air or a wrestler mid-jump. A slow shutter speed (like 1/3 of a second,) creates motion blur, which is great for silky smooth waterfalls or flowing rivers.
Here’s a couple examples to illustrate the point:

This photo, taken at the Arena Coliseo in Mexico, was taken at a shutter speed of 1/1000th of second.

This photo, taken at the Ghost Forest in Oregon, was taken at a shutter speed of 1/3 of a second. Notice how it captured the quick movement of the water, yet still left it silky smooth.

This photo, taken at Point Reyes in California, had a shutter speed of 30 seconds. This allowed the water to take on that mystical, foggy vibe.
One important thing to note is that the shutter speed also affects the amount of light entering your camera. A fast shutter speed lets in very little light, while a slow shutter speed brings in much more light. This will matter later when we balance all three settings, and may need to compensate for lack of (or) excessive light.
Aperture
Aperture can often be the most confusing part of the triangle to understand because of the terms and abbreviations associated with it- but I’m going to break it down nice and easy. In a basic sense, aperture controls the depth of field, or how much of your image is in focus.
A shallow depth of field focuses on a single object, and will have a blurry background (think f/1.8 or f/2.8, for example). A large depth of field keeps much more of the scene in focus (think f/16 or f/22, for example).
Aperture is measured in f-stops. f/1.8 or f/2.8 have a large aperture opening, a shallow depth of field, and more light entering. f/16 or f/22 have a small aperture opening, a larger depth of field, and less light entering.
Here are a couple of examples:

This photo, taken at Roxoborough State Park in Colorado, has a shallow depth of field because it was taken at f/4. Notice how only the orange leaf is in focus, while the foreground leaves and the background leaves are both out of focus, or “blurry.”
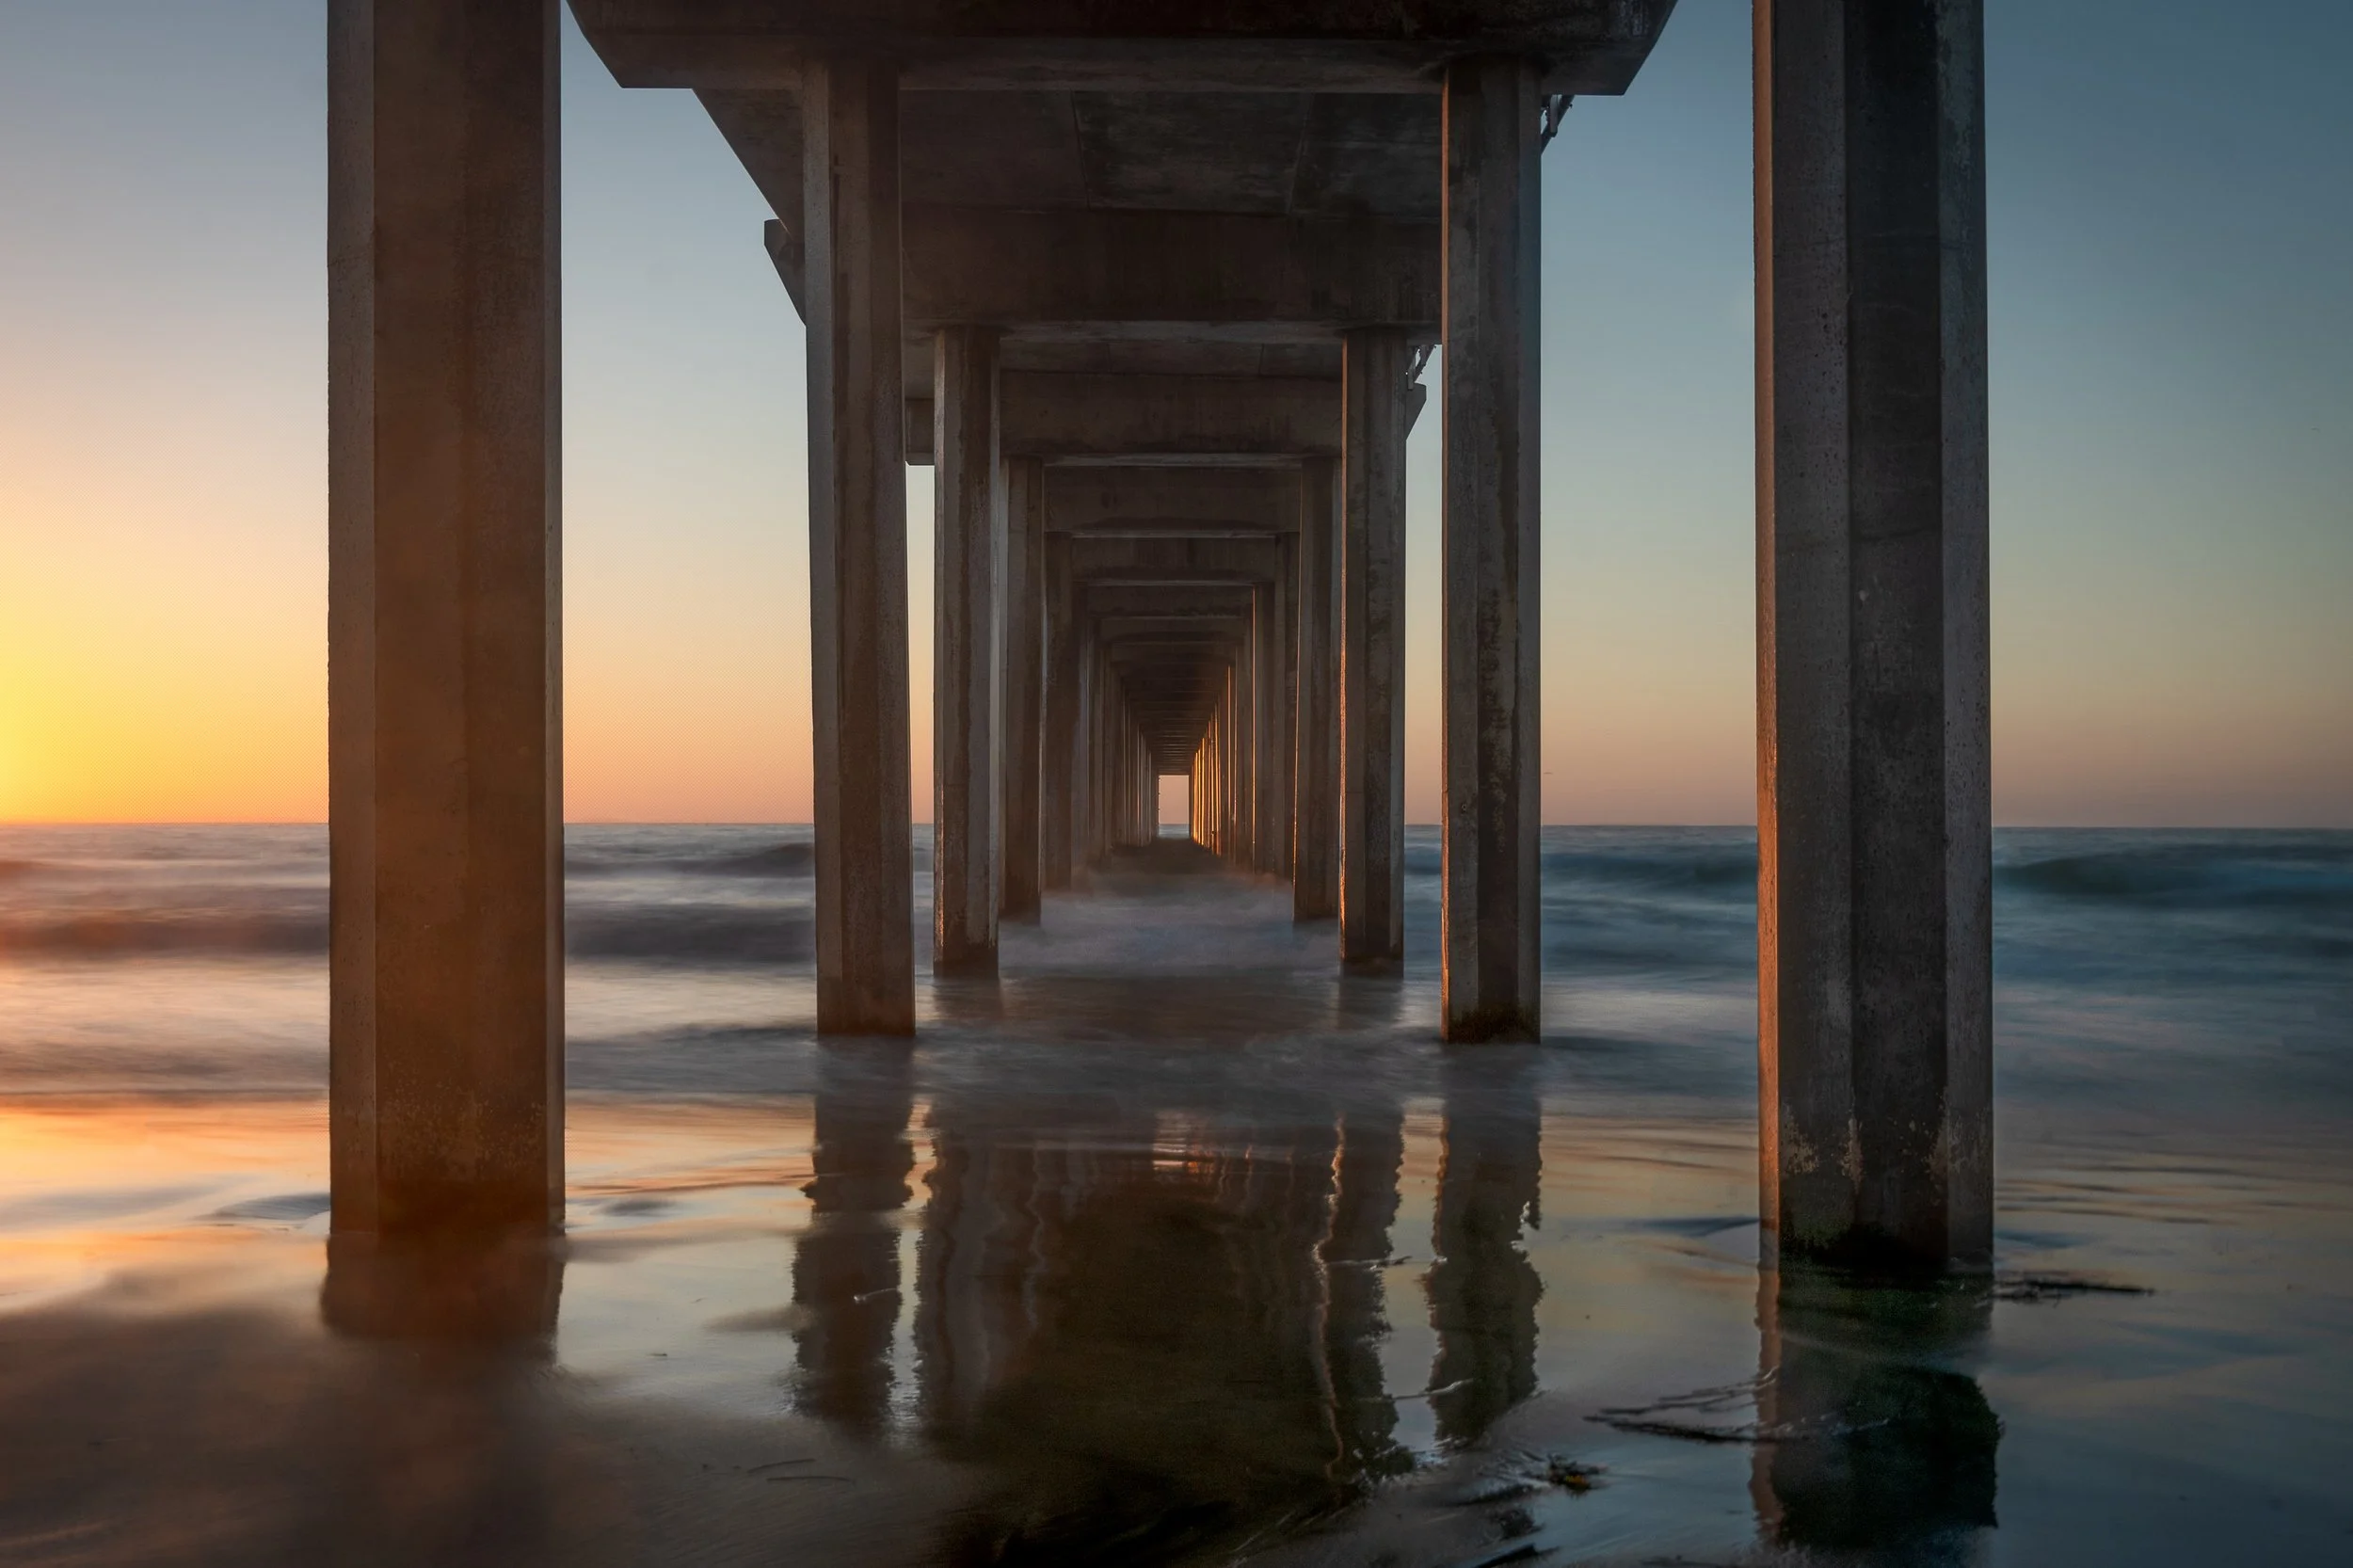
This photo, taken at Scripps Pier in California, has a high depth of field, because it was shot at f/22. Notice how both the close pillars and the far pillars are in focus.
ISO
ISO is the final component of the exposure triangle. It affects your camera’s sensitivity to light and the amount of grain (or noise) in the image.
A low ISO (like 100, for example) contains minimal grain, and is ideal for bright, light intensive conditions. A high ISO (like 2000–3000, for example) contains more grain, but can help add brightness in low-light situations.
As a rule of thumb if you stay between ISO 100-3000, your images will have minimal grain and will look clean. If you must go above ISO 3000, it’s not the end of the world, but grain will most likely begin to become visible.
However if you’re savvy in Photoshop, there’s plenty of tools you can use to reduce your grain, as long as it’s not excessive (i.e. ISO 10,000+).
Here’s a couple examples of ISO:
This photo at ISO 100 is clean and sharp.
This photo at high ISO shows noticeable grain, which can sometimes be used for a moody or film-like effect.
Here’s a couple examples:
This photo, taken in Denver, Colorado, was taken at ISO 100. Notice how there’s little to no grain in the photo, and it’s crystal clear.

This photo, taken at a party in Nowhere in California, was taken at ISO 8000. Notice how there’s a decent amount of grain in the shot.
Balancing the Triangle
Now that we understand what shutter speed, aperture, and ISO are, let’s see how they work together. Balancing them in manual mode is key to properly exposing your photo. Start by asking yourself two questions:
How much motion blur do I want?
How much depth of field do I want?
Once you have the answer to these two questions, you can begin to adjust your settings accordingly. Let's go through a couple of examples to see how this works.
Example 1: Long Exposure Waterfall
Say your goal is to get a photo of a waterfall, and you want the water to have a little bit of motion blur. The solution is to use a slow shutter speed (like ⅓ of a second), as this will make the water silky smooth and give it that blur.
However, since a shutter speed like ⅓ of a second is going to bring in a decent amount of light, we’re going to have to compensate with a low ISO, (like ISO 100,) and a higher aperture (like f/16.) If we don’t, the image may be over-exposed in some areas.
If the low ISO and high aperture still don’t do the trick, we may have to apply an ND filter to make sure it’s exposed properly.

This photo, taken at Myrtle Falls in Washington, was taken using an ND filter because it was relatively bright outside.
Example 2: Frozen Water Droplet
Let’s go through another example where we want to adjust the shutter speed. Except say this time, your goal is to get a photo of a water droplet frozen in mid-air, with minimal motion blur. The solution is to use a high shutter speed (like 1/2000th of a second,) in order to freeze that motion.
However a high shutter speed isn’t going to bring in much light into the camera. Thus, we will have to increase the ISO, and/or decrease the aperture to compensate for this lack of light. Else, the image may be under-exposed.

This photo, taken at Los Arenales Primo Tapia in Mexico, was taken at 1/8000 of a second, which “froze” the sand in the air.
Example 3: Portrait with Blurred Background
Let’s consider another example, except one where we want less depth of field in the shot (AKA, a more blurred background.) Say your goal is to get a portrait where the subject is the only part in focus, isolating it from its background. The solution is to lower your aperture, to something like f/1.8, f/2.8, or f/4.
However, since a low aperture opens the shutter wider, it’s going to bring a massive amount of light into the camera. This means we’re going to have to increase the shutter speed and lower the ISO to compensate for this.
When using a mirrorless camera, you can see all these changes in real-time through the viewfinder, before you take the photo. With practice, adjusting these settings to balance each other out will become second nature.

This portrait, taken at the Headquarters in Colorado, has a blurry foreground because I took the photo at f/4.
Tricky Situations and Solutions
Now, although this seems fairly straightforward, you’re soon going to realize that there’s a variety of situations that can be challenging to balance. Let’s cover some of the more common problems, and their respective solutions.
Keep in mind that some of these solutions are high level. These means they may involve advanced techniques in order to execute. But have no fear- we will cover them later in this course, and I will link to the technique as I discuss it. Right now, the important thing is to understand that solutions do exist for these problems.
Long Exposures on a Bright Day
A common problem with long exposure photos is that even with a low ISO and high f-stop, your photo will be overexposed- especially if you’re shooting in the middle of the day.
The solution is to use an ND filter to reduce the incoming light, which will allow for these longer exposures without blowing out the photo. Another solution is to shoot waterfalls or moving bodies of water at dusk, twilight, or during cloudy days.
Focus Challenges
Another common problem is if you’re shooting fairly close to a subject, you may not be able to get the entire scene in focus- even if you’re shooting at a high aperture, like f/16+.
The solution is to either back-up, or use Focus Stacking. Focus stacking is an advanced technique we’ll learn later on in this course that involves taking multiple shots at different focus points and blending them in Photoshop.
As you spend more time in the field, you’ll quickly learn how your distance from the subject will affect the aperture.
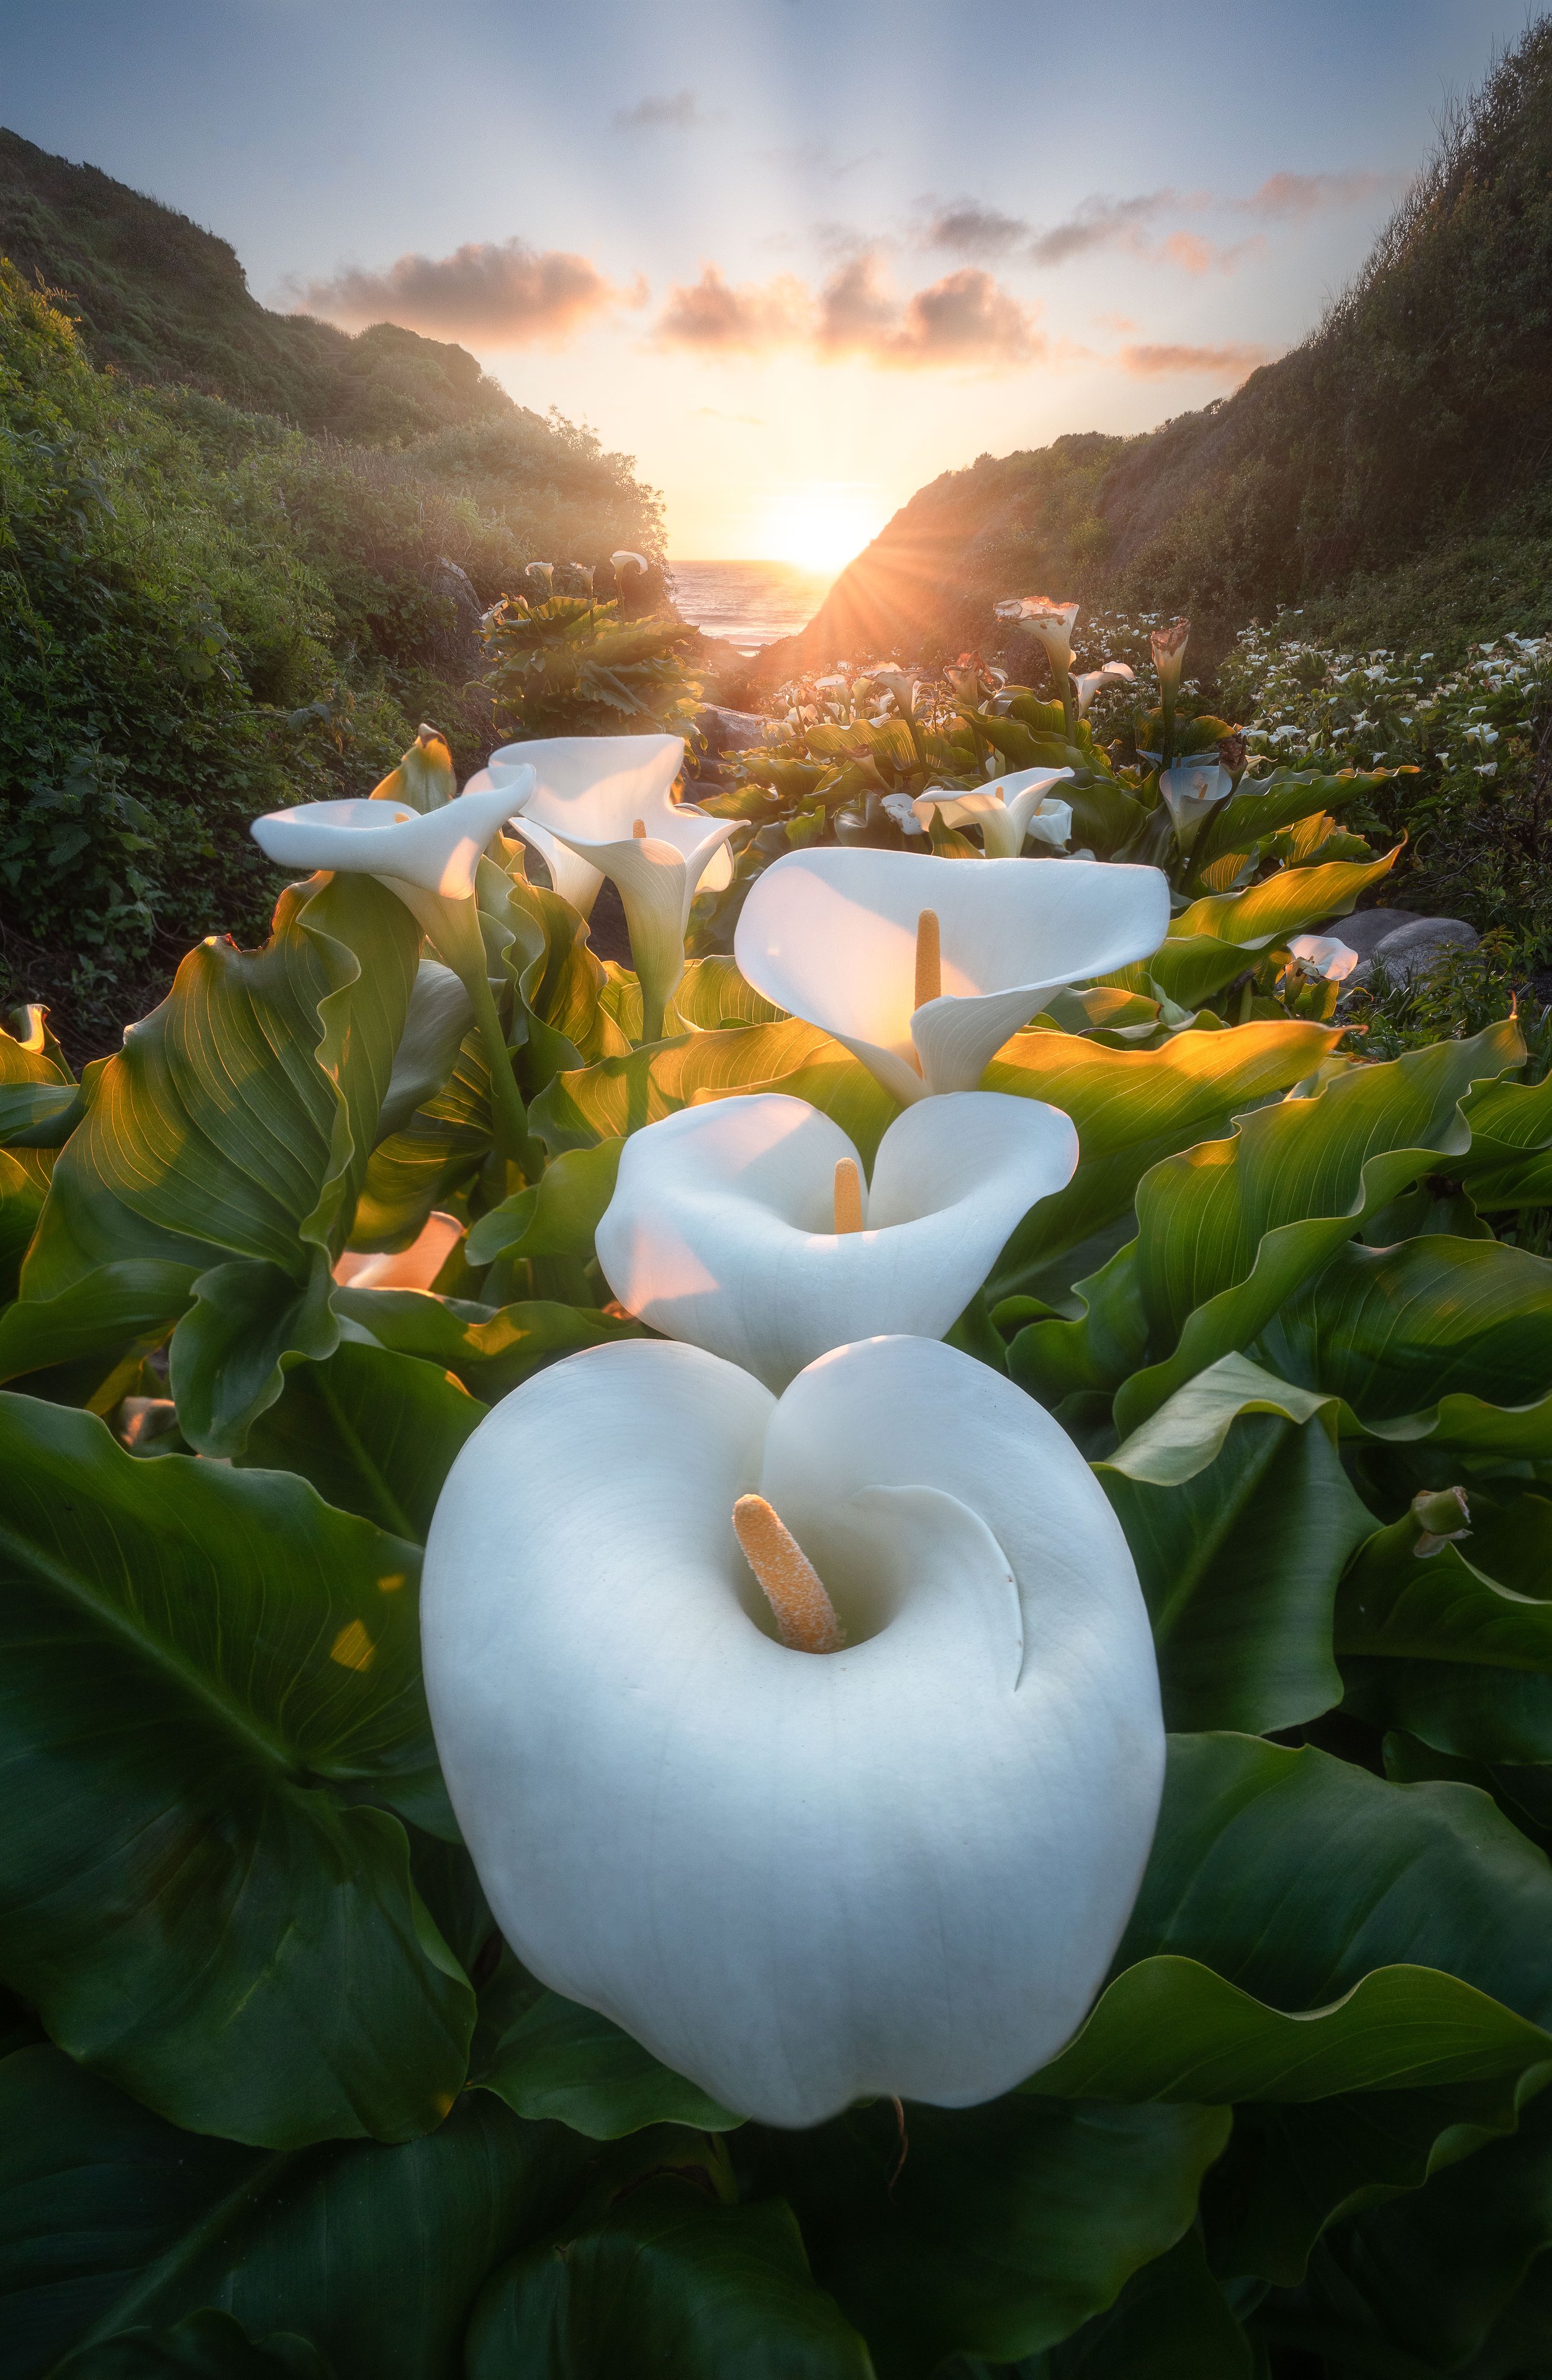
This photo, taken at Calla Lily Valley in California, was focus stacked to ensure the foreground flower and the background were both in focus.
High Dynamic Range Scenes
Scenes that have a high Dynamic Range can often present a problem if your sky is much brighter than your foreground.
The solution is to take two exposures (one for the sky, one for the foreground) and combine them in Photoshop using an Exposure Blend. Alternatively, you can use a Gradient ND Filter if the horizon is level.
Moving Leaves in Long Exposures
Say you’re shooting a waterfall during twilight, and everything is looking perfect. The water is blurring properly, and you’ve got a nice low ISO and a high aperture to compensate. The only problem is that there’s a slight breeze in the air, and the leaves on a nearby tree are coming out blurry because of your low shutter speed. But you only want that blur to apply to the water…
The solution here is to keep your camera on the tripod in the same position, and to take a second shot of the scene at a high shutter speed, but with a similar exposure. You may need to adjust the aperture and ISO again. The goal of this shot is to freeze those moving leaves, and as a bi-product you’ll have choppy, frozen water.
Now, you can combine these two images in Photoshop using a Time Blend. With a proper masking technique, you’ll be able to put both the blurry water and the still leaves into one image- keeping the best of both worlds.

This photo was taken at Sol Duc Falls in Washington. A time blend was used to combine one photo that had the blurry water, and another photo that frozen the leaves in the breezy air.
Final Thoughts: Mastering Manual Mode
The key to mastering the exposure triangle is practice, practice, practice. Force yourself to use Manual mode until it feels natural, then move onto Aperture Priority, Shutter Priority, and Auto Mode when deemed necessary.
When you can adjust your settings quickly and confidently, you’ll never miss the perfect shot because you were fumbling with your camera. Exposure is the foundation of all photography- master it, and everything else will follow.
In the next tutorial, we’re going to dive into the next most important component of photography- Focus!