
How to Photograph Stars Like a Pro
Learn ten tips to improve your astrophotography.
Prefer to watch this tutorial in video format? 😏
Astrophotography is a notoriously complicated genre of photography, so I'm going to cover ten tips that should help you handle most astrophotography situations with ease.
Let’s jump in!
Tip #1: Research the Milky Way’s Position
Now, there are a couple of ways to do this, but my favorite method is through Google Earth. Simply switch your interface to night mode, you can see exactly where the Milky Way will be positioned for certain compositions.
You can even put yourself on the ground in a specific location to see how the Milky Way will align with mountains, trees, waterfalls, or any other element you want in your shot.
There are also plenty of other apps, such as PhotoPills, that can help you align the Milky Way. Most of them use augmented reality, which allows you to point your phone at the sky and see exactly where stars, the moon, and the Milky Way appear at specific times. This is incredibly useful if you’re on location.
However keep in mind that the Milky Way has a particular season. In the Northern Hemisphere, it’s visible from February to October, and in the Southern Hemisphere, it’s visible from late January to November.
During these times, you’ll be able to see the galactic center and capture the most detail in your Milky Way shots.
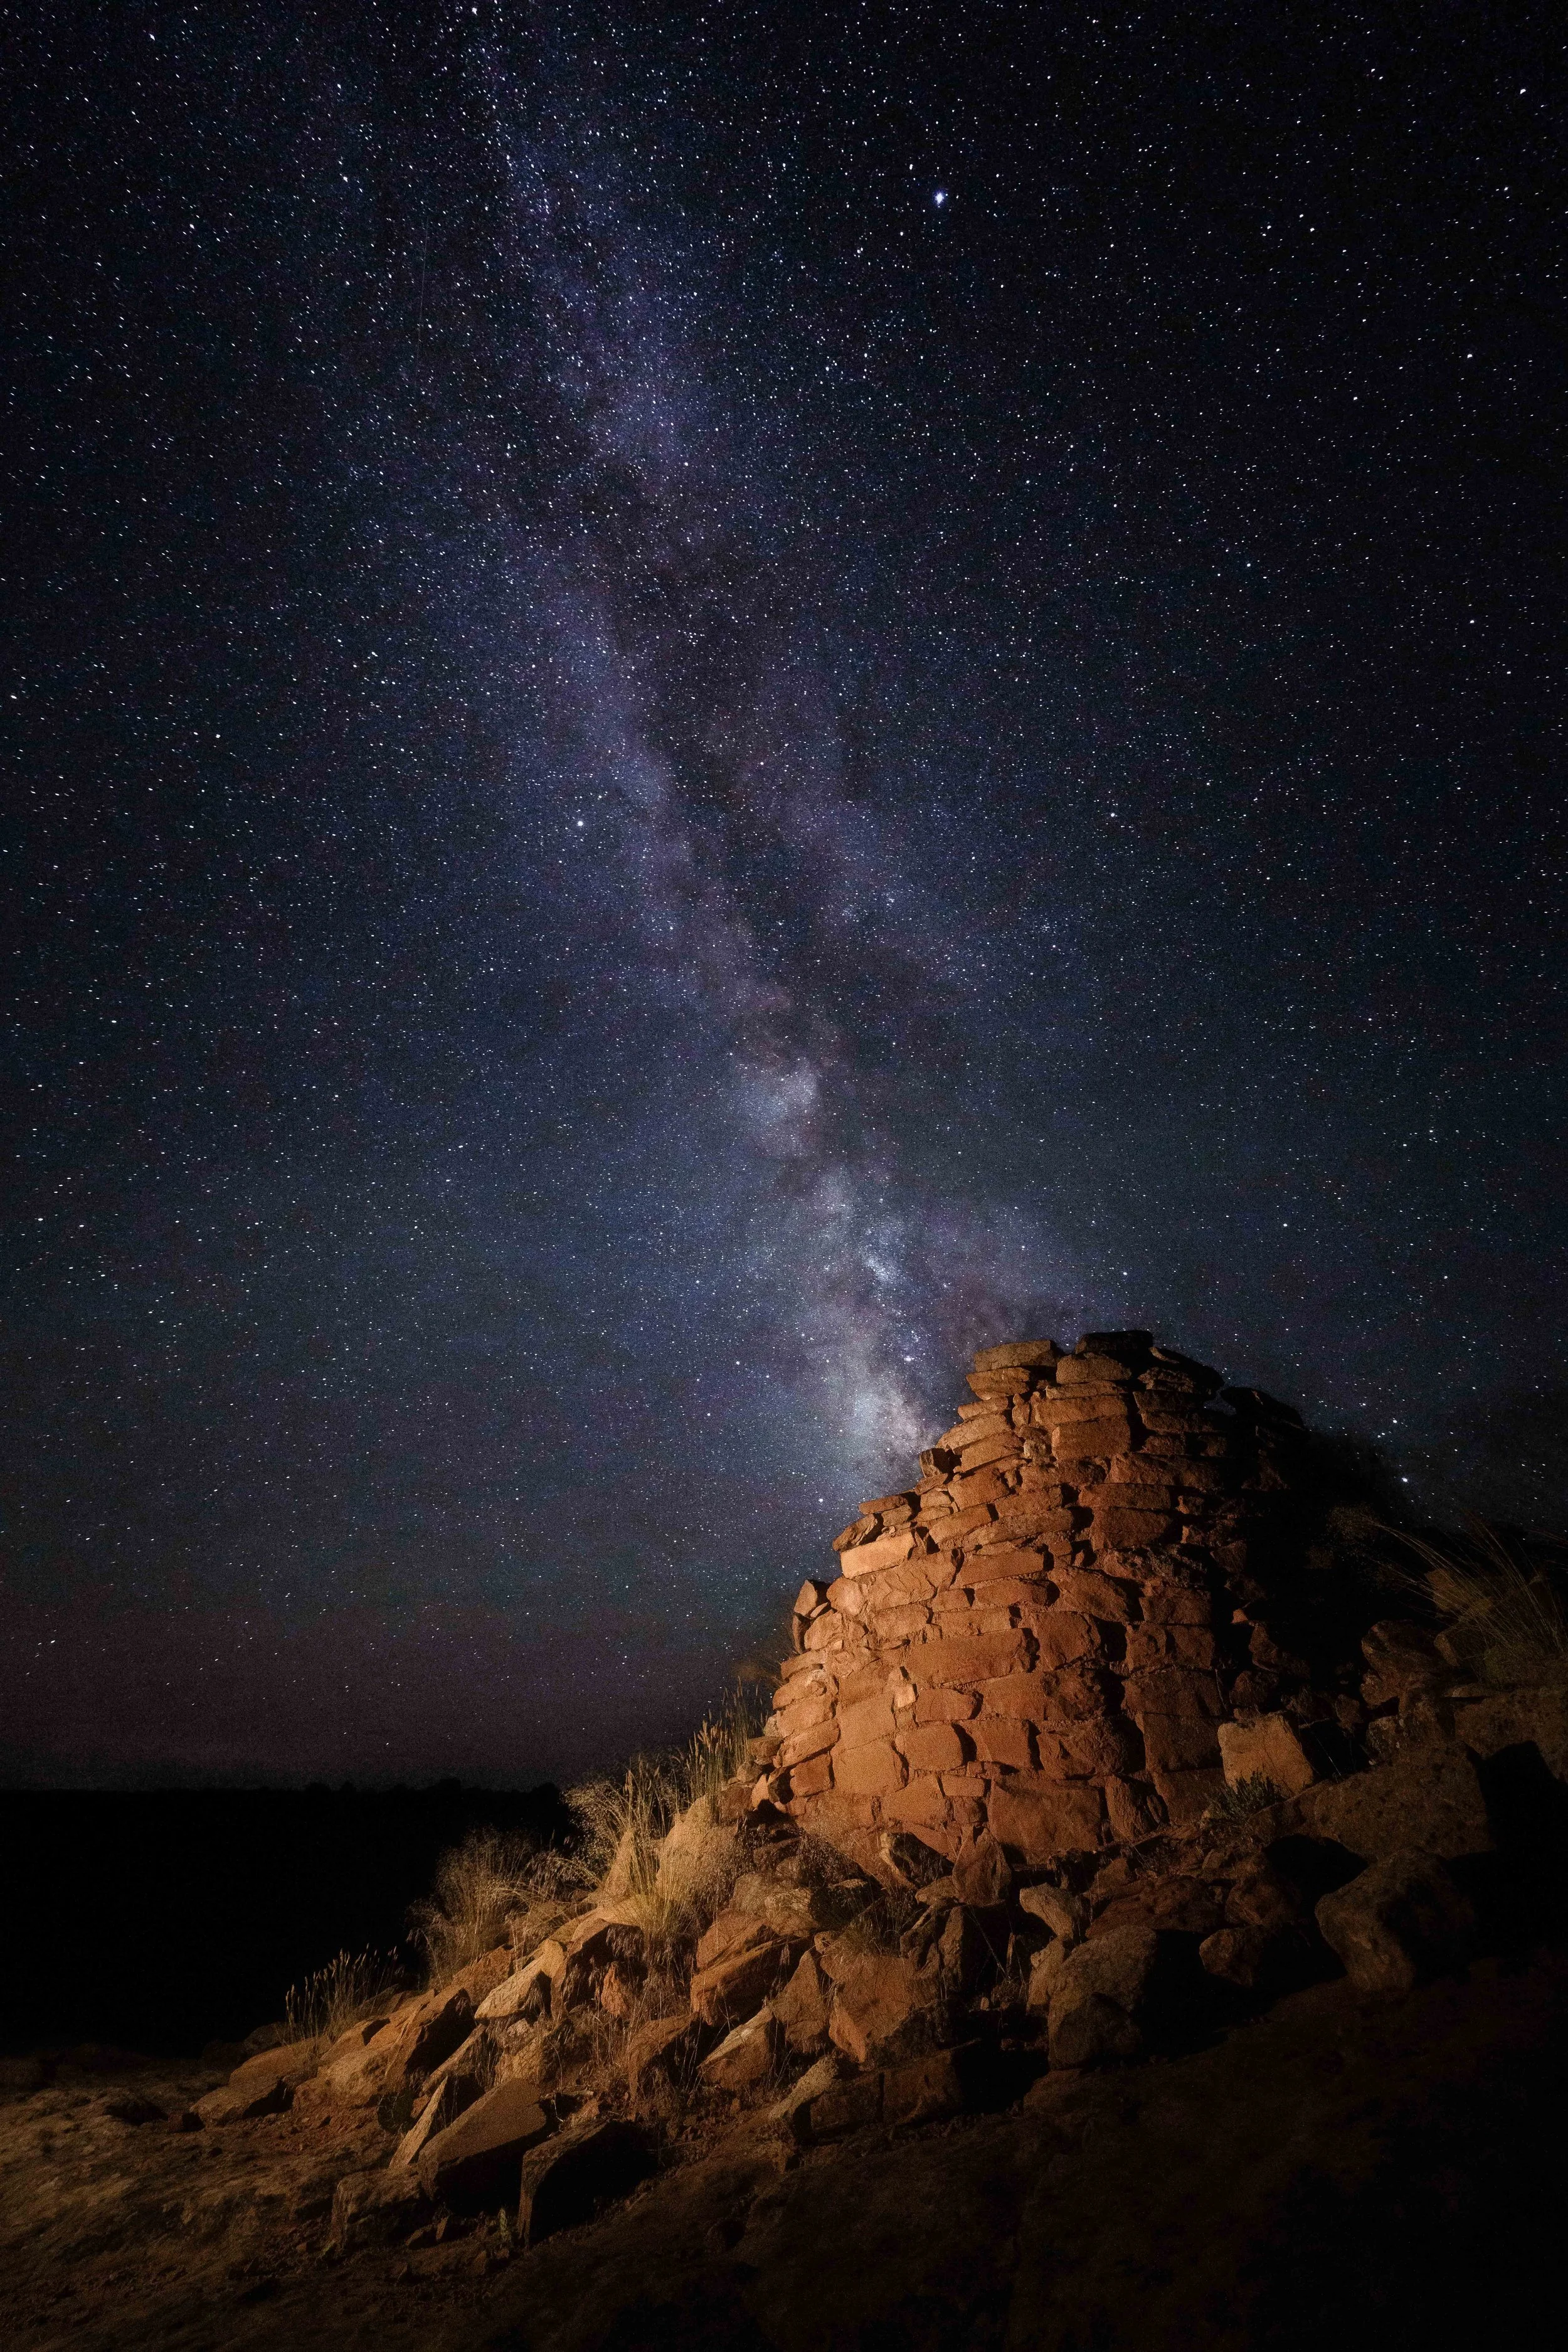
Before I went out to take this photo at the Cave Towers in Utah, I was able to align the Milky Way’s position to determine that the shot would work.
Tip #2: Get a Star Tracker
A star tracker is a device that mounts to the top of your tripod and connects to the camera. It slowly follows the stars as they move across the sky, allowing you to capture longer exposures with more detail.
Without a star tracker, you typically can’t shoot exposures longer than about 15 to 25 seconds without getting motion blur from the Earth’s rotation. The star tracker allows you to counter this.
Tip #3: Dial Your Camera Correctly
Astrophotography relies on a fairly specific range of settings. Let’s go over them.
For ISO, aim between 3200 and 6400. This is bright enough to capture stars without introducing too much noise. Some high-end cameras can handle 10,000 or even 12,000 ISO with minimal noise, but most cameras work best around 3200 to 6400 ISO.
For focal length, I recommend something between 14mm and 28mm. The Milky Way usually spans a wide portion of the sky, so a wide-angle lens gives you a more complete view. Zoom lenses are fine if you want to capture specific elements of the Milky Way, but you’ll have to counter the Earth’s rotation with faster shutter speeds.
The shutter speed depends on your focal length, but usually it’s somewhere between 10 and 25 seconds. We will cover this more precisely in the next tip when I introduce the 500 Rule.
In general, having your shutter open too long will cause the stars to blur or trail due to Earth’s rotation, which makes your photo look less crisp. If, however, you want to have long star streaks in your photos, you can leave your shutter open for several hours using Bulb mode. (I cover this extensively in Tip #10)
Finally, for aperture, shoot around f/2.8 or lower if your lens allows. Lenses that can go to f/1.8 or f/1.4 will let in even more light, but f/2.8 works great for most setups.

This photo, taken at the Valley of Dreams in New Mexico, had an ISO of 3200, a 10mm focal length, f/5.6 aperture, and a 25 second exposure time.
Tip #4 Understand the 500 Rule
The 500 Rule helps you calculate how long you can keep your shutter open before the stars start to blur. The formula is simple: divide 500 by your focal length.
For example, if you’re shooting with a 50mm lens, 500 ÷ 50 = 10, meaning you can use a 10-second exposure before stars begin to blur.
If you’re using an APS-C sensor, multiply your focal length by 1.5 before dividing. For Canon APS-C sensors, multiply by 1.6, and for Micro Four Thirds, multiply by 2.
This formula isn’t always exact, but it gives you a solid starting point. Always double-check your shots in the field to make sure the stars are sharp before you head home.
Tip #5: Use a Two-Second Shutter Delay
When you press the shutter button, even a tiny shake can cause blur in your long-exposure photo. Setting a short timer delay beforehand gives your camera time to stabilize before capturing the image.
This is a practice I follow for all long exposures, but it’s especially important for Milky Way photography since even the smallest vibration can blur the stars.
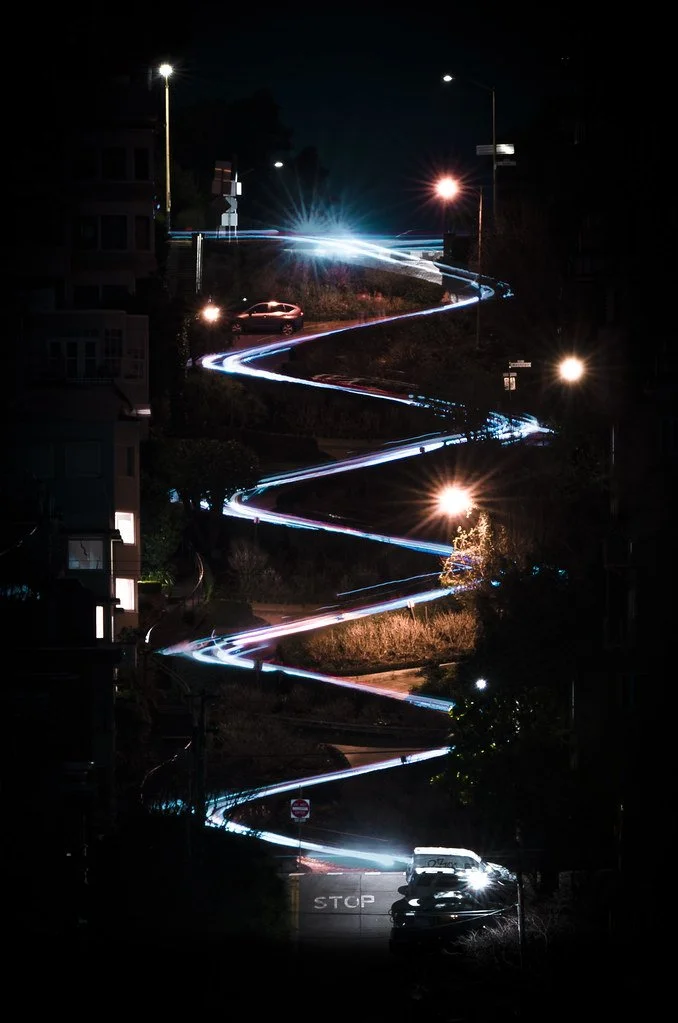
This photo was taken in San Francisco, where I used a two-second timer delay to ensure their was no camera shake caught in the long exposure shot.
Tip #6: Achieve Proper Focus on a Star
Autofocus doesn’t always work well for stars, so you’ll need to use manual focus. First, make sure your display brightness is at its maximum and that exposure compensation is enabled. Then, switch your lens to manual mode and rotate the focus ring until it reaches the infinity mark.
After that, go into your camera’s live view, zoom in on the brightest star you can find, and fine-tune the focus ring until the star appears perfectly sharp. Once you have it dialed in, your camera will stay in focus for the night as long as you don’t move the tripod.
Please note that these instructions may vary slightly from camera to camera model.
Tip #7: Avoid Light Pollution
You’ll get the best astrophotography results far from cities or towns. This is because of something called light pollution, which is the effect massive city lights have on the night sky.
Many national and state parks in the United States have designated “dark sky” regions that are ideal for astrophotography. I like to use a Light Pollution Map to find locations in the region I want to photograph.
And of course, always plan around the weather. If there are clouds forecasted, you most likely won’t be able to see the stars, so aim for nights projected to have a clear sky.
Tip #8: Try a Twilight Blend
A twilight blend involves taking one shot during blue hour (right after sunset,) and another in the middle of night when the Milky Way is visible. During blue hour, you’ll capture the foreground with rich detail and color, rather than just a silhouette. Then, when the Milky Way comes out, you take a long exposure of the sky from the exact same position.
Do not move the tripod during this time frame to ensure everything lines up perfectly, especially if you don’t have a flat horizon.
Once you have both images, you can mask the two images together in Photoshop to create a surreal image. I cover this process in detail in the Sky Blend blend tutorial. videos.this process in the sky and exposure blending videos. It takes extra time, but the results are worth it.

This photo, taken at Goosenecks State Park in Utah, is a great example of a twilight blend. If I only took the photo after dark, I’d only be able to see the sky.
Tip #9: Try Light Painting
If you missed the blue hour foreground opportunity, you can still illuminate objects by using a portable light. I usually carry around a small RGB light for this. You can place it near rocks, arches, trees, or other objects to highlight them in the darkness. Try moving the light around, using different colors, or placing it behind your subject to get interesting effects.
This method works best for smaller scenes, but it adds great dimension and contrast to your shots in the dark.

This photo, taken at Delicate Arch in Utah, is a great example of how I used light painting to illuminate the arch and my silhouette after dark.
Tip #10: Create Light Trails
Have you ever seen those images of beautiful curved lines across the night sky? Those are stars, captured in a long exposure lasting several hours.
In order to do this, first put your camera in time-lapse mode, or use an intervalometer if your camera doesn’t have this feature built in. Then, set it up to take 15 to 20 second exposures every second for one to three hours.
Now, hop over into Photoshop with all of these images, and blend the images together using the lighten blend mode, or a third-party program like StarStax.
This technique will combine all the stars’ mini trails across multiple images into one continuous trail. The longer your timelapse, the longer your trails will be. This technique is great because it gives you control when editing- you can easily remove unwanted frames if someone walks through your shot, or if a car or plane passes by.
On the flip side, if you take a single three-hour exposure (via Bulb mode,) you risk your image being ruined by a couple bad frames.
Alright! Those are my ten tips for astrophotography- one of the most exciting genres of photography if you don’t mind staying out late.
Let’s jump into the tutorial, where I discuss ten tips to improve Desert photography.