
The Best Time of the Day for Photography
Learn when to shoot photography, and about the five different types of lighting.
Prefer to watch this tutorial in video format? 😏
Introduction
In this tutorial, I'm going to be talking about when to shoot. More specifically, I’m going to discuss what the best time of the day is for taking photos, and what weather conditions are most optimal for photography.
I'll start by going over some general tips and tricks, break down the five main types of lighting, and then I’ll recommend a couple apps and tools to help you out. Let’s jump in!
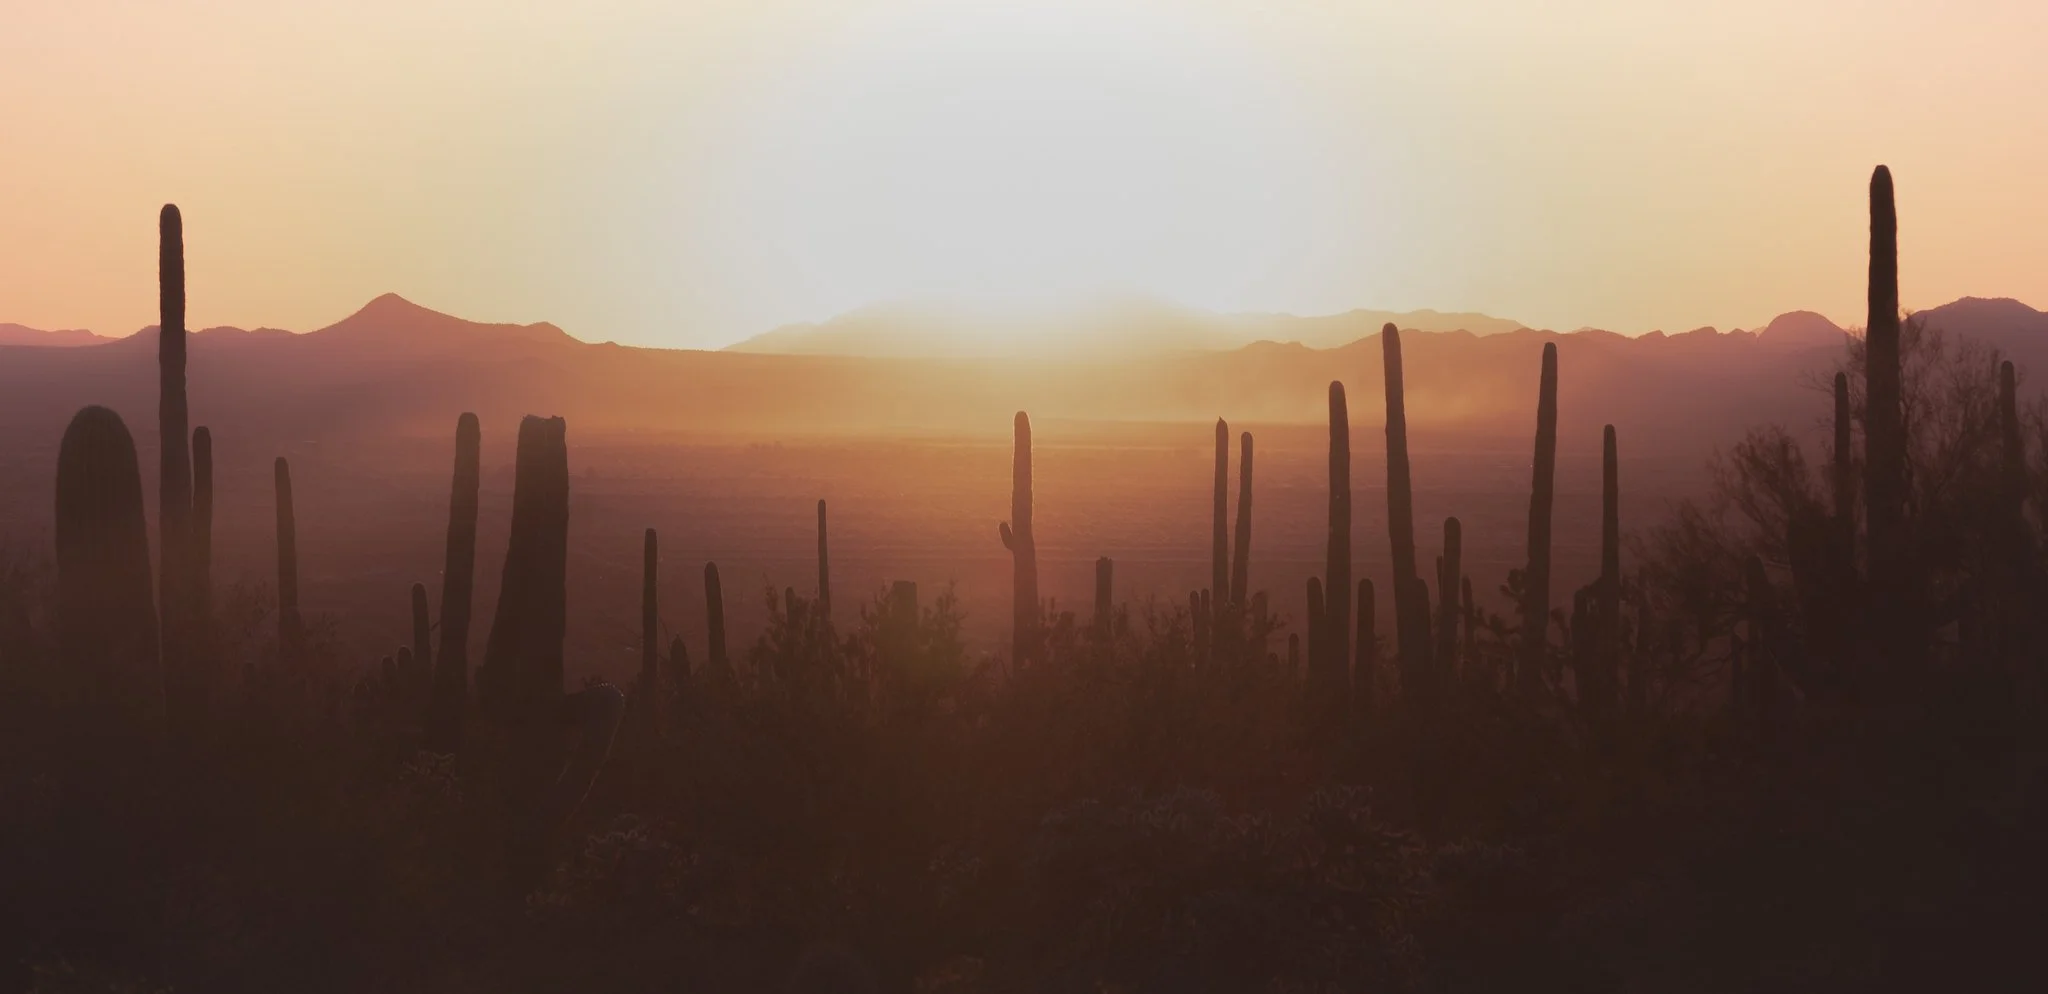
This photo, taken at Saguaro National Park in Arizona, was taken during golden hour lighting.
General Tips
Let’s start by talking about two tips that will help you get into the lighting “mindset.” There’s a lot of variables at play when it comes to lighting, which means not every rule will be set in stone.
Tip #1: You’re a Slave to the Light
The number one thing to realize as an adventure photographer is that you are a slave to the light. Sounds degrading, right? Well, don’t think of it like that. What I mean is that since we’re primarily working with natural light, it’s our job to capture whatever the sun decides to illuminate that day.
Depending on your perspective, this can be a positive or a negative. I choose to view it as a positive, because photography becomes extremely easy when you simply follow the light. Look at where the sun is shining, and take a photo. That’s it. That’s all there is to it.

In this photo, taken at the La Jola Tide Pools in California, the sun showed me exactly what to shoot.
What trips most beginners up is that they go out with a specific agenda in mind. They say, for example, "I want a photo of this arch, illuminated by the sunrise, with a colorful sky.” Usually it’s based off of some image they’ve seen online.
But more often than not, they’re going to end up disappointed, because the weather doesn’t listen to anyone. Instead, shifting the focus to what is actually being illuminated inevitably leads to a more joyful photography experience- even if it wasn’t what you originally had in mind.
Tip #2: Bad Weather = Great Photos
The second biggest tip I have is that the worse the conditions are, the better the photography usually is.
Everyone goes out to shoot when the skies are perfectly clear, but few people shoot when it’s snowing, raining, or blazing hot out. Which inevitably makes your photos different. Drama in the weather means drama in your photos, so learning to embrace the bad weather is especially important to adventure photography.

This photo, taken at Crater Lake in Oregon, was taken during a long, rainy adventure.
The Five Types of Lighting
In this section I’m going to break down the five types of lighting that you could encounter during the day, and what types of photos work best in them.
1. Golden Hour
The first, and best type of lighting you’re going to encounter for adventure photography is Golden Hour. If you’ve heard any tips about photography before taking this course, it’s probably been “shoot at Golden Hour.” And they’d be right.
Golden Hour occurs one hour after sunrise, and one hour before sunset. It’s often considered the most beautiful time of day for photography because the light comes in from the side and creates a glowing warmth with soft shadows. Clouds can also be illuminated by the sun during this time, creating beautiful orange colorscapes.
As a general rule of thumb in photography, side light is always better than light from above. But is there a difference between sunrise and sunset? Let’s cover a few of the key differences:
Sunrise, in my opinion, is almost always preferable to sunset for a few reasons. For one, there’s substantially fewer people around. This can make a massive difference in popular locations, like National Parks and viral destinations. The sunrise also usually produces a hazier light from the night before- which means there’s a better chance for soft lighting.
The biggest con of sunrise is that it can be difficult to scout the location in the dark. Unless you’ve been to the location before, or know exactly where you’re going to shoot from, you’ll have minimal time to prep your composition before the lighting gets good. This means you have to be ready to work fast, and running late can cost you the entire shoot.

This photo, taken at Oak Valley Plantation in Louisiana, was taken at sunrise. During daytime hours, this walkway is normally packed with people.
Sunset, on the other hand, gives you all the time in the world to prepare a composition. You can show up to a scene hours before sunrise, find a bunch of foregrounds you enjoy, and be properly Warmed Up by the time the sun starts to set.
The only problem is that depending on the popularity of the location, you may have people running in and out of your shot when the lighting matters most. It’s a game of give and take, and you have to figure out what timeframe works best for you.
One thing to keep in mind is that many locations only look good during sunrise or sunset- not both. This is because the sunlight may only illuminate a scene during a particular time of the day. I like to browse photography forums and blogs to get inside information about what time of the day certain scenes look good. You can also ask locals or photographers online that have experience shooting in these places.
What people also don’t account for is disrupting features. Sure, a scene may look best at sunset. But it might not look best right at sunset, because distant mountains or trees can cause the sunlight to hide before the actual sunset time. Just another thing to keep in mind when planning an adventure.

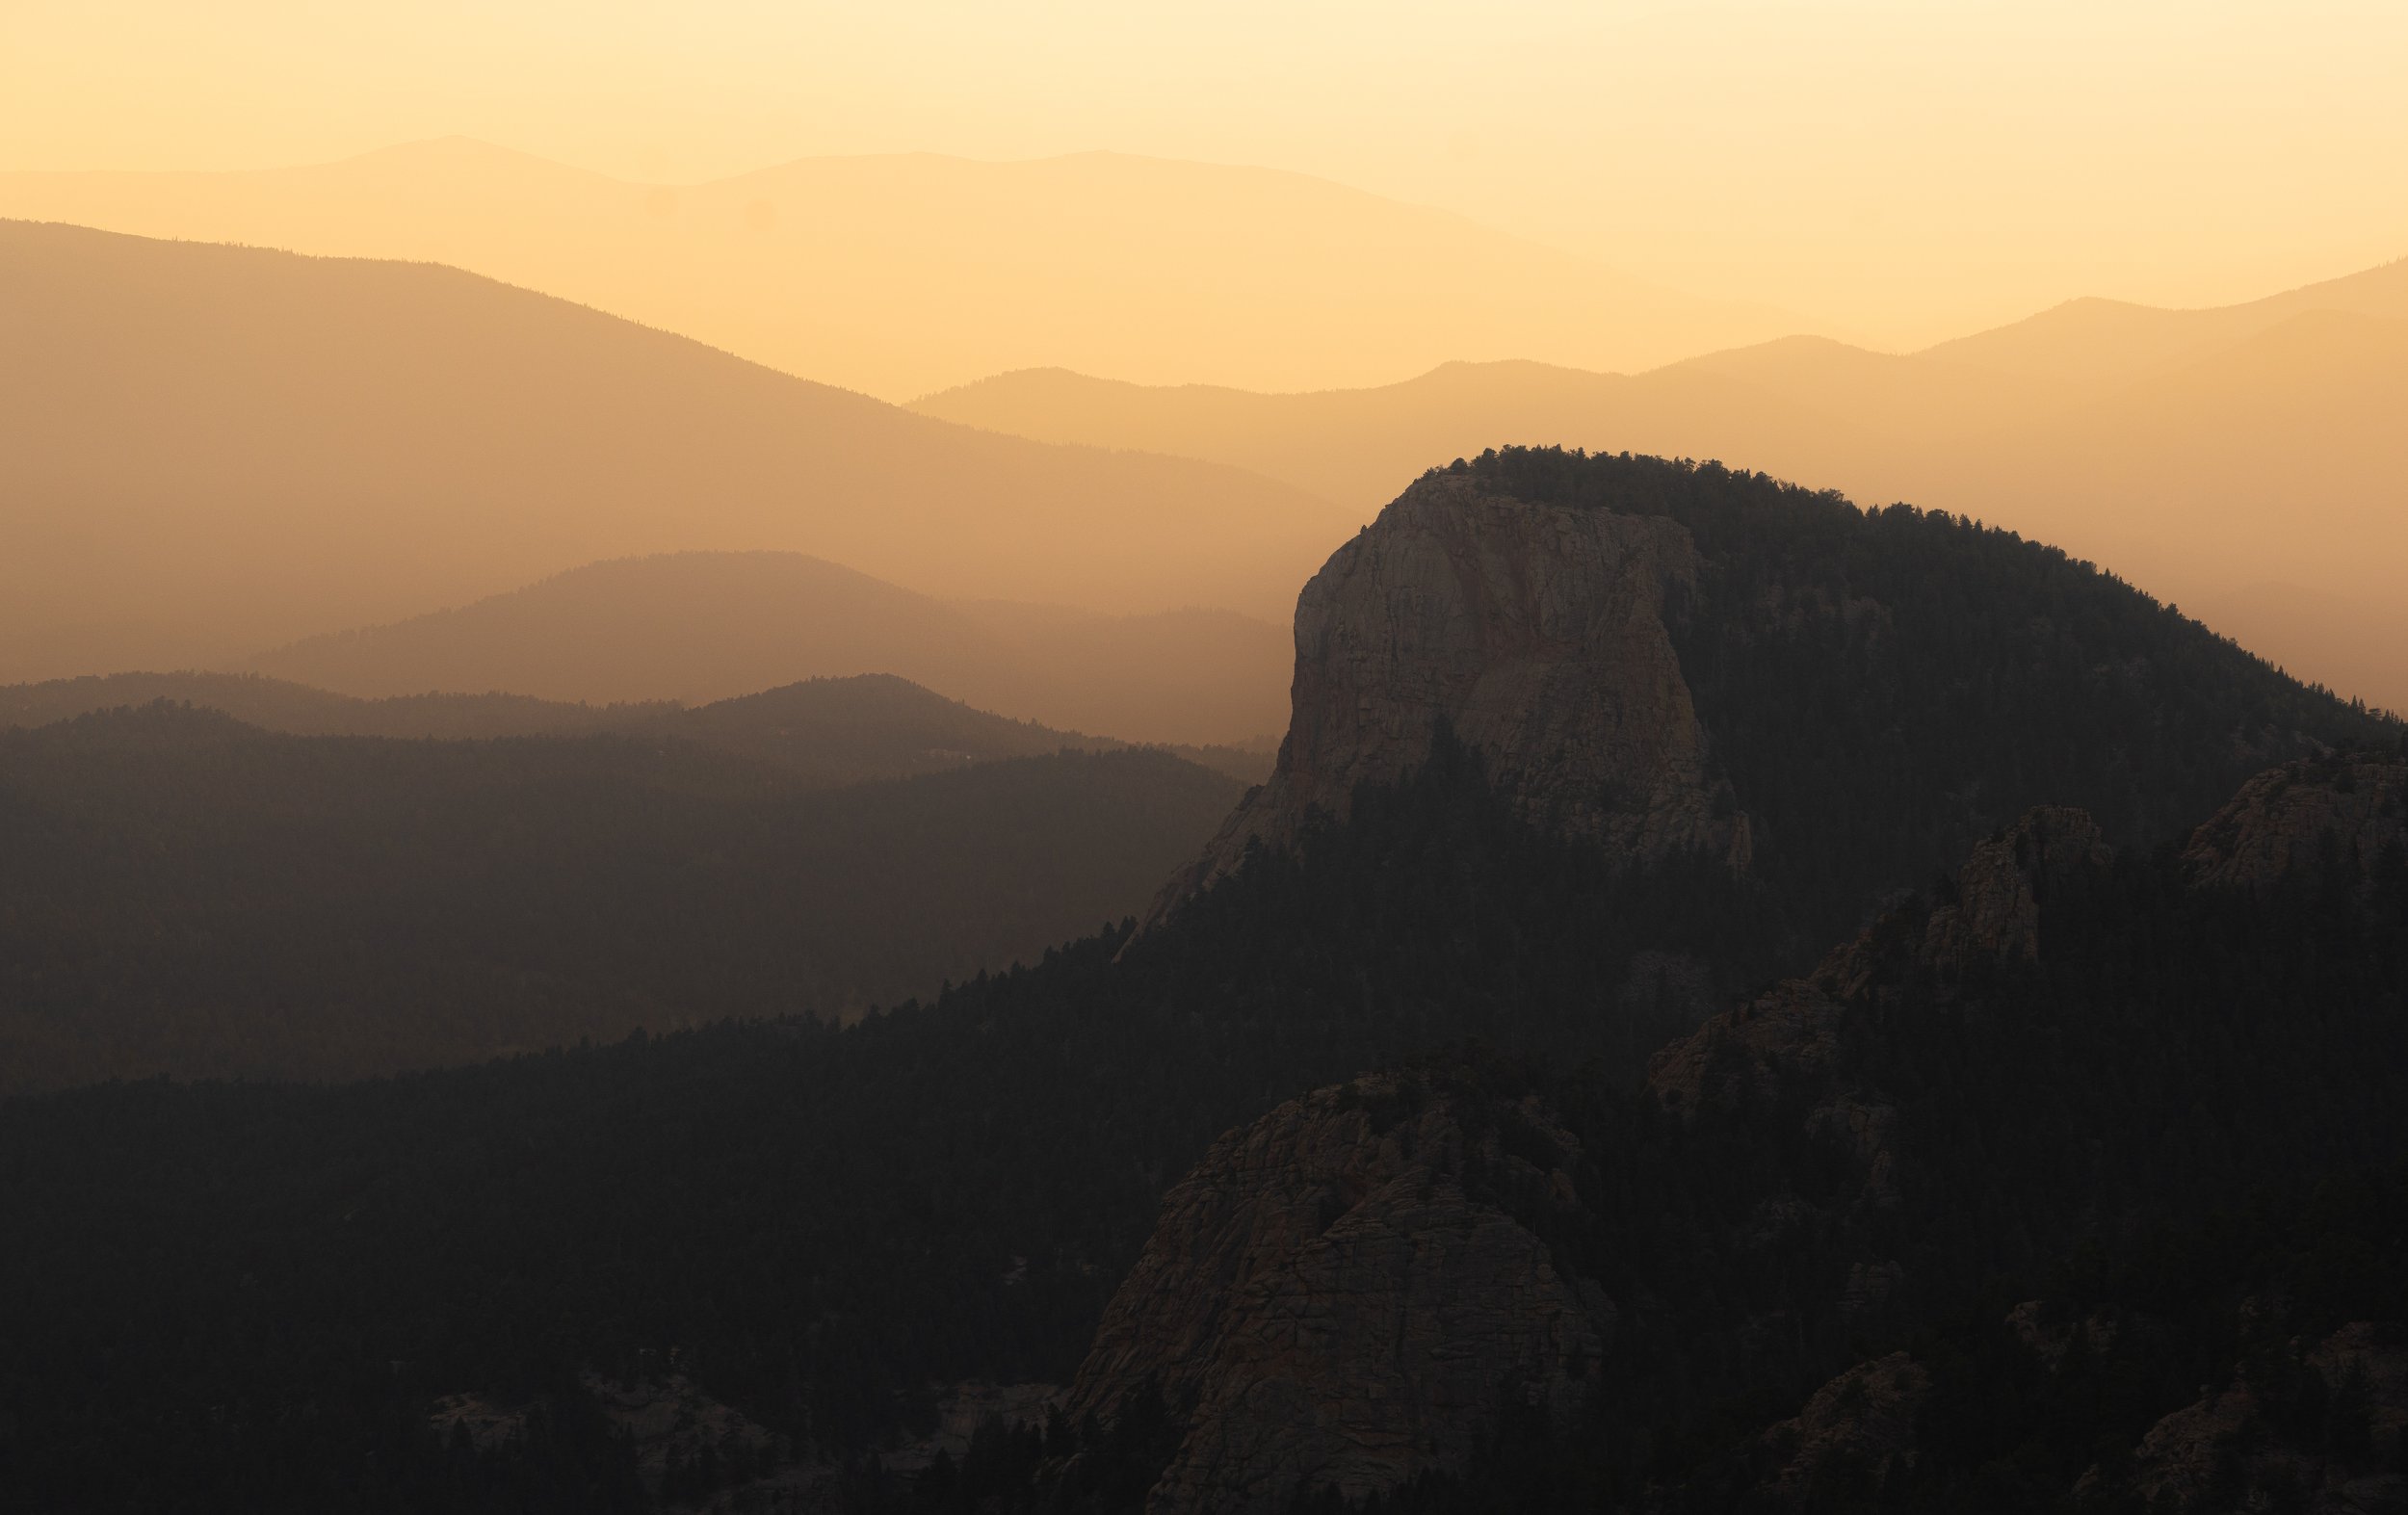
This photo, taken at the Flatirons in Boulder, Colorado, can only be achieved during sunrise. That’s because the sun rises in the East, illuminating them in the morning light. The sun sets on the opposite side of the mountain, casting them in shadow during sunset.
One final factor to consider with Golden Hour is hiking. If you’re traveling to a scene that’s three miles down a trail, take into consideration that it will be dark for either the walk in or the walk back.
Bring a flashlight or headlamp, and ensure your phone is charged so that it can be used as a backup light source. It’s also helpful to know exactly where you’re going, (with the help of a GPS unit,) so you’re not trailfinding in the dark. Trust me, there’s no worse feeling than realizing you can’t remember the way back when the woods are getting darker be the second.
Pro-tip: if you’re nervous about hiking in the dark alone, bring headphones and listen to a podcast. It’s an easy way to get out of your head about what might be lurking in the dark.

This photo, taken at a cave in Rock Bridge State Park in Missouri, involved a fairly intense walk back to my car because I took the wrong trail in the dark.
2. Twilight / Dusk
Twilight begins just after the sun dips below the horizon, and dusk begins an hour or so before the sun rises. These timeframes are when the sky is blue and highlighted with purple, pink, and orange tones, depending on the clouds.
Many photographers pack up shop as soon as golden hour is over, but twilight leaves us a lot to work with if you know what to look for.
For one, it’s great for quiet light conditions. Even though the sun has set (or is about to rise,) there is still a plethora of light coming from that direction- it’s just more subtle. One of my favorite things to do is take photos during this period, and use Dodge/Burn tools within Photoshop to accent the light better. This gives us the opportunity to pair the scene with colorful, moody skies that might not exist during golden hour.

This photo was taken at Sahalie + Koosah Falls in Oregon during twilight. Notice how there’s a soft lighting still illuminating the trees, and I was able to highlight this in Photoshop using subtle Dodging/Burning tools.
Twilight and dusk are also great for silhouettes, as well as waterfall long exposure shots. Since the light is faint, you’ll be able to skip the ND filter and achieve that silky water look without the extra gear. You’ll also avoid any unnecessary glare in the water from sunlight.

This photo, taken at Mt. Storm King in Washington, is a great example of how silhouettes can be achieved during twilight lighting.
3. Night
Next up is night time, where there’s little to no lighting at all. This leaves you with a few options- you can either rely on artificial light, use long exposures to bring in more light, or use a combination of these techniques.
The great thing about night photography, especially in an urban environment, is that the subjects are vastly simplified. Street lights illuminate scenes, and that’s what you're left with. There’s no opportunity to force subjects, like during the day. They simply exist as they are, and you can shoot them or not.
However, things begin to get more complicated when you bring in your own light sources. For example, if you bring along a portable RGB light to illuminate arches, rocks, or trees in the dark, suddenly the world is your oyster.
The other obvious genre of photography you can shoot at night is astrophotography. This involves shooting the Milky Way, and/or placing subjects in the foreground. In general, if you want to look for a new moon (AKA no moon,) avoid light pollution from nearby cities, and ensure there’s no clouds in the sky to get a solid shot. Check out the Astrophotography tutorial for more in-depth tips.

This photo, taken at Alien Throne in New Mexico, involved astrophotography techniques.
4. Midday Lighting
On the opposite side of the spectrum is midday lighting- the most common type of lighting you’ll encounter. It’s when the sun is high in the sky, it’s bright, harsh, and widely considered to be the most difficult types of light to work with.

This photo, taken at Factory Butte in Utah, was taken during midday lighting. Using the harsh shadows and contrast, I was able to embrace the harsh conditions to create something unique.
However if you’re up for the challenge, it can be a rewarding time of the day for specific genres. Let’s check out a few examples:
Deserts: Use contrast and sharp shadows to create small, bold scenes.
Forests: Aim to shoot 1-2 hours after sunrise or before sunset. You want the sunlight coming through the trees at an angle.
Canyons: The interesting thing about canyons is that the only time of the day light shines into them is when the sun is directly above, or at a very specific angle. Timing is key for canyons if you want the correct illumination.
Caves and Building Interiors: Two great options if you find yourself wanting to shoot in the middle of the day, but it’s too bright to go outside.
Macro Scenes: Depending on the environment, macro (or small) scenes can work during midday lighting. This is because you can often find small shady areas without harsh lighting. Botanic gardens can be a great option here.

This photo, taken at Bosque Los Colomos in Mexico, was shot during midday lighting. If you’re stumped about to shoot, lean into finding smaller scenes in the shade.
5. Weather-Based Lighting
Finally, we land on my favorite type of lighting- weather-based. This means rain, snow, fog, mist, overcast, heat, and even smoke are interfering with the natural sunlight.

This photo, taken at Konza Prairie in Kansas, was taken during a foggy morning.
These are often the most freeing conditions because you can shoot at any time of day. There’s no pressure, no “sunset countdown,” and no waiting. You simply walk outside and start shooting. Let’s break down each of these conditions in more detail:
Fog: Soft and silky lighting conditions. When it’s foggy or misty out, you can pretty much shoot all day long. It’s fantastic, and leads to great, mysterious shots.
Rain: Similar to foggy conditions, but more difficult to work with. Depending on the intensity of the downpour, you’ll have varying degrees of visibility. I love shooting in the rain because of the reflections it creates, granted it’s not windy or absolutely down-pouring. (Pro-tip: use lens hoods and a rain cover.)
Snow: Snow is also great for daytime adventures, assuming it’s coming down lightly. It creates a great mood and contrast, especially if the snow is fresh.
Smoke: Wildfires, create a soft, hazy light and diffuse the harsh midday sun. This makes it ideal for portraits and unique landscape photos.
This photo, taken at Staunton State Park, was taken during a devastating wildfire season in Colorado. The result was a soft hazy glow.
Helpful Tools & Apps
Now let's cover a few tools and apps to help you plan your adventures. These can greatly increase your chances of hitting the right conditions.
Sun Tracker Apps
Download an app that displays sunrise and sunset times. Since you’ll often be shooting around these times, this can be super helpful. I personally use a widget on my home screen to check sunrise, sunset, and moon phases. I also have a notification on my watch that alerts me two hours before sunset every day.
A fantastic app I’d recommend is PhotoPills. It includes an augmented reality feature where you can see exactly where the sun will rise or set in your location. This is great for planning how the sun will illuminate a certain scene at sunrise or sunset.
Note: I'm not endorsed by PhotoPills—I just love the app.
Weather Radar Apps
You should also install a weather radar app. This helps you track incoming storms and plan the best times to shoot. If you're debating between a week of sun or a week with intermittent storms, choose the stormy week. The best shots often come right before or right after a storm, when the skies are the most dramatic.

This photo, taken at the Grand Tetons in Wyoming, was taken moments after a major rainstorm passed through the area.
Final Thoughts
That’s everything you need to know about lighting. As you get more experience in the field, you’ll begin to understand on a deeper level how hard and soft light affect a scene.
The five different types of lighting each comes with its own strengths, challenges, and moods. Understanding them is essential for becoming a well-rounded adventure photographer.
If you’re new to photography I’d recommend shooting primarily during Golden Hour, as it’s hard to make something look bad during this time of the day. As you get more comfortable, begin to layer in different lighting conditions to challenge your skillset.
Let’s go ahead and hop into the next tutorial, where I discuss how Social Engineering can open new photo opportunities!