
All The Photography Slang You’ve Ever Wanted to Know
Learn some popular photography terms you might hear tossed around in the field.
Prefer to watch this tutorial in video format? 😏
Introduction
In this tutorial, I’m going to run through all of the popular popular photography words and phrases that you may encounter in the field. This will ensure you’re hip to the scene when other photographers start throwing jargon at you.
Now, I’ve got about thirty terms here, and I’m going to run through them in alphabetical order. It’s everything from modern slang, to goofy words, to outdated terms, to everything in between.
I’ll try to keep this list updated as more words roll into the culture.
Let’s jump in.

This photo, featuring insane lighting conditions at Sol Duc Falls, is what you’d call a “banger.”
A List of Photography Slang
Artifact - This generally refers to a spot within your photograph that’s distorted, has noise issues, or some other kind of problem. Usually, it’s caused by a camera or lens malfunction (i.e. more frequent in cheap models,) though it can also appear if you edit the sharpness, texture, or clarity in your photo too much. The good thing is that artifacts are easy to erase, usually with Healing tools.
Aspect Ratio - Aspect ratio refers to the proportions of your image or Camera sensor. The most common camera aspect ratio is 4:3, but 16:9, 3:2, and 1:1 are also common. The 1:1 ratio is a square format- if you’ve ever seen the movie The Lighthouse, that entire film was shot in 1:1, and it’s actually a great study in composition. Most cameras shoot 4:3 ratio right out of the gate, but you can edit the ratio in post-production by Cropping.

Notice how this shot taken on California Street in San Francisco has a 1:1 aspect ratio.
Banger - This word is straight out of YouTube photography culture. It means you got a great shot. For example, if someone says, “What a banger,” or “I got some absolute bangers last weekend,” it means they took some great shots.
Barrel Distortion - This is what happens when you’re shooting with a wide-angle lens and the edges start to stretch outward. You can usually fix this in post-production with Transformation tools. Higher quality lenses can help avoid this issue, but at any focal length lower than 14mm, it’s practically inevitable.
Bulb Mode- This is a setting that is used to control the shutter speed. If you switch your shutter to bulb mode, it means the shutter will stay open as long as you’re holding down the shutter button. This allows you to control how long your long exposure is. Now, you don’t actually hold it down by hand because that would cause the camera to shake- this mode is usually used in conjunction with an intervalometer or a remote shutter. Bulb mode is necessary for long exposures that exceed 30 seconds, which is the cut off for most camera’s in-house timer settings.
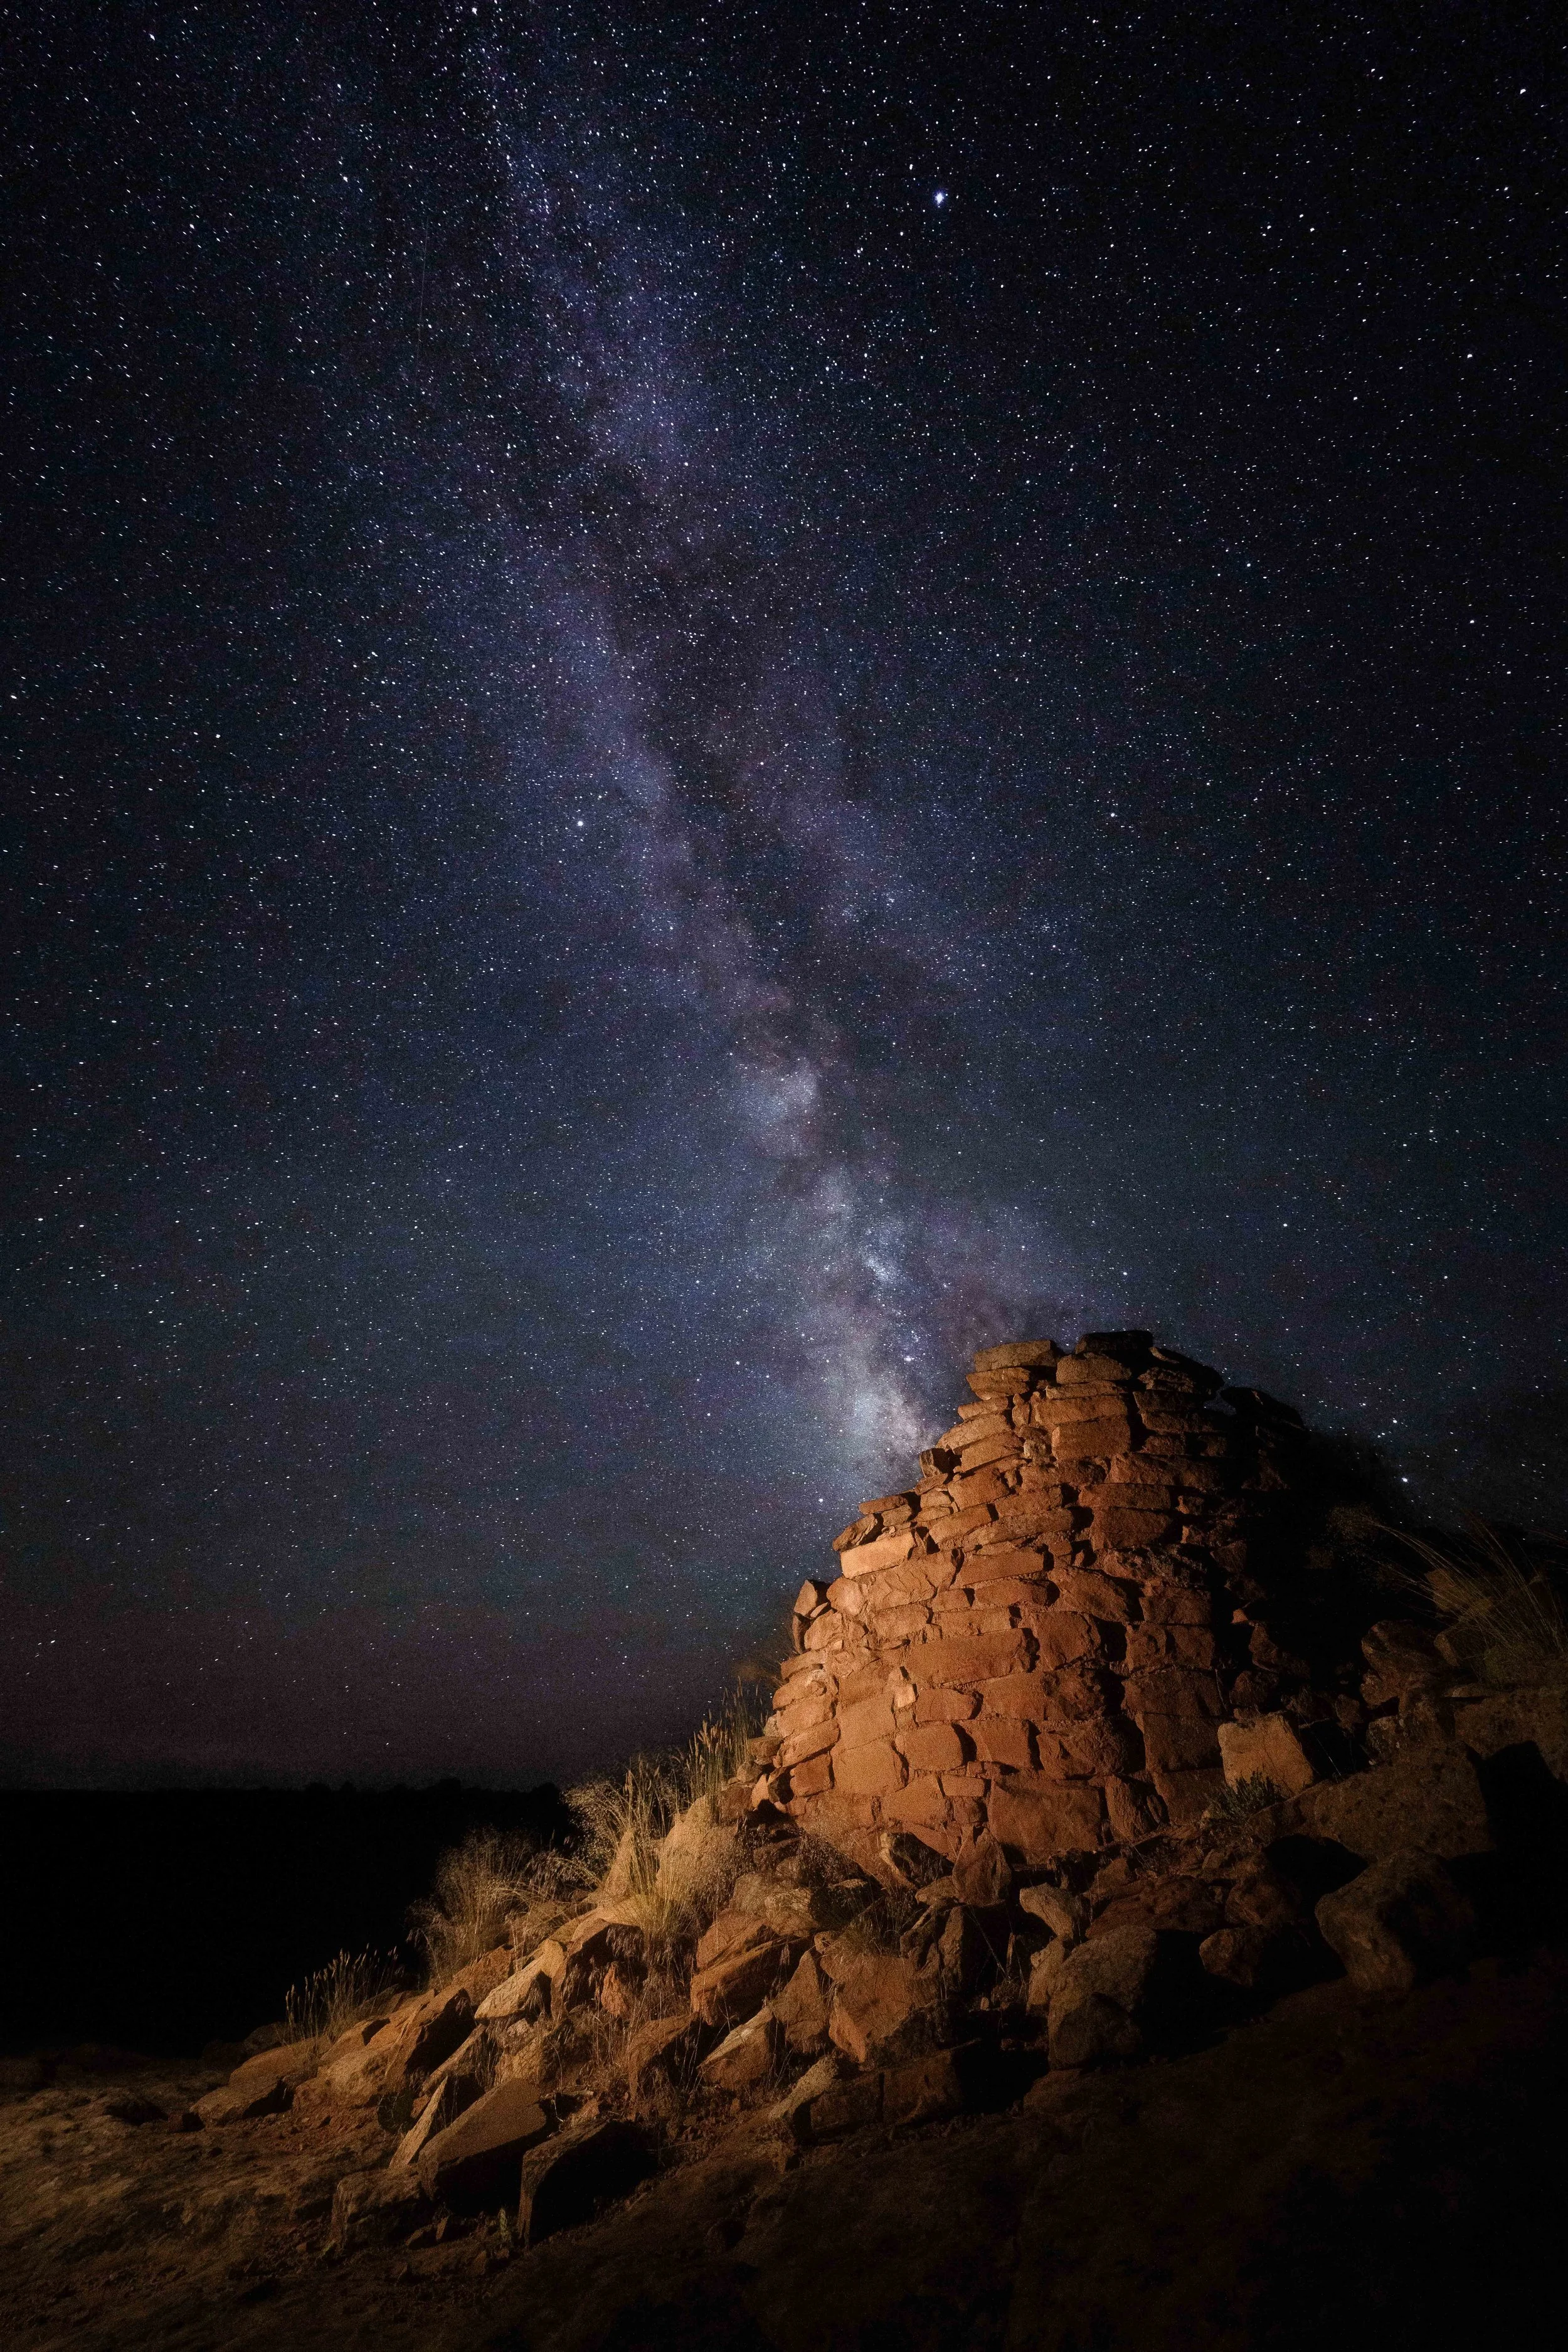
I hardly do any photography that needs an exposure longer than 30 seconds, but here’s a neat astro photo I took at the Cave Tower that was a 20 second exposure.
Candid - You’ve probably heard this one before, but in photography, candid refers to a natural, unposed shot. It is usually taken without the person’s knowledge, or it appears to be taken without their knowledge. Candid photos look more natural, and give your photos a more real look.
Digital Negative (.DNG) - This is Adobe’s universal format for RAW photos. You can convert your RAW files into .DNG if you want to send them to someone else to edit them. Different camera brands have different RAW file extensions- for example, Sony uses .ARW, Nikon uses .NEF, and Canon uses .CRW.
Dust Bunnies - These are tiny dust spots that appear on your sensor. You can clean them with a sensor air blower, or get your camera professionally cleaned if that doesn’t work. More information about this available in the Care tutorial.

This photo, taken at Ruby Beach in Washington, initially had a massive amount of dust bunnies because fog shots always seem to reveal the spots on your sensor. But I cleaned em’ all up in Photoshop!
Fast vs. Slow Lenses - When someone says a lens is “fast,” it means it has a wide maximum aperture like f/1.4 or f/1.8. A “slow” lens has a narrower maximum aperture, like f/4 or f/5.6. They’re referred to as fast or slow because wider apertures allow you to shoot at faster shutter speeds for the same exposure.
Flare - This usually refers to lens flare, which happens when you shoot directly into sunlight. You might get a bright ray or star-shaped effect in your image. Some photographers like it as it adds a certain style, while others find it unprofessional- however it can be fixed through Frequency Separation in Photoshop. Flares also can occur if your lens is dirty, scratched, or there’s a filter on it. Fun fact- if you shoot at a higher f-stop, like f/14, you can get a more pronounced star in your shot if the sun is cornering something.
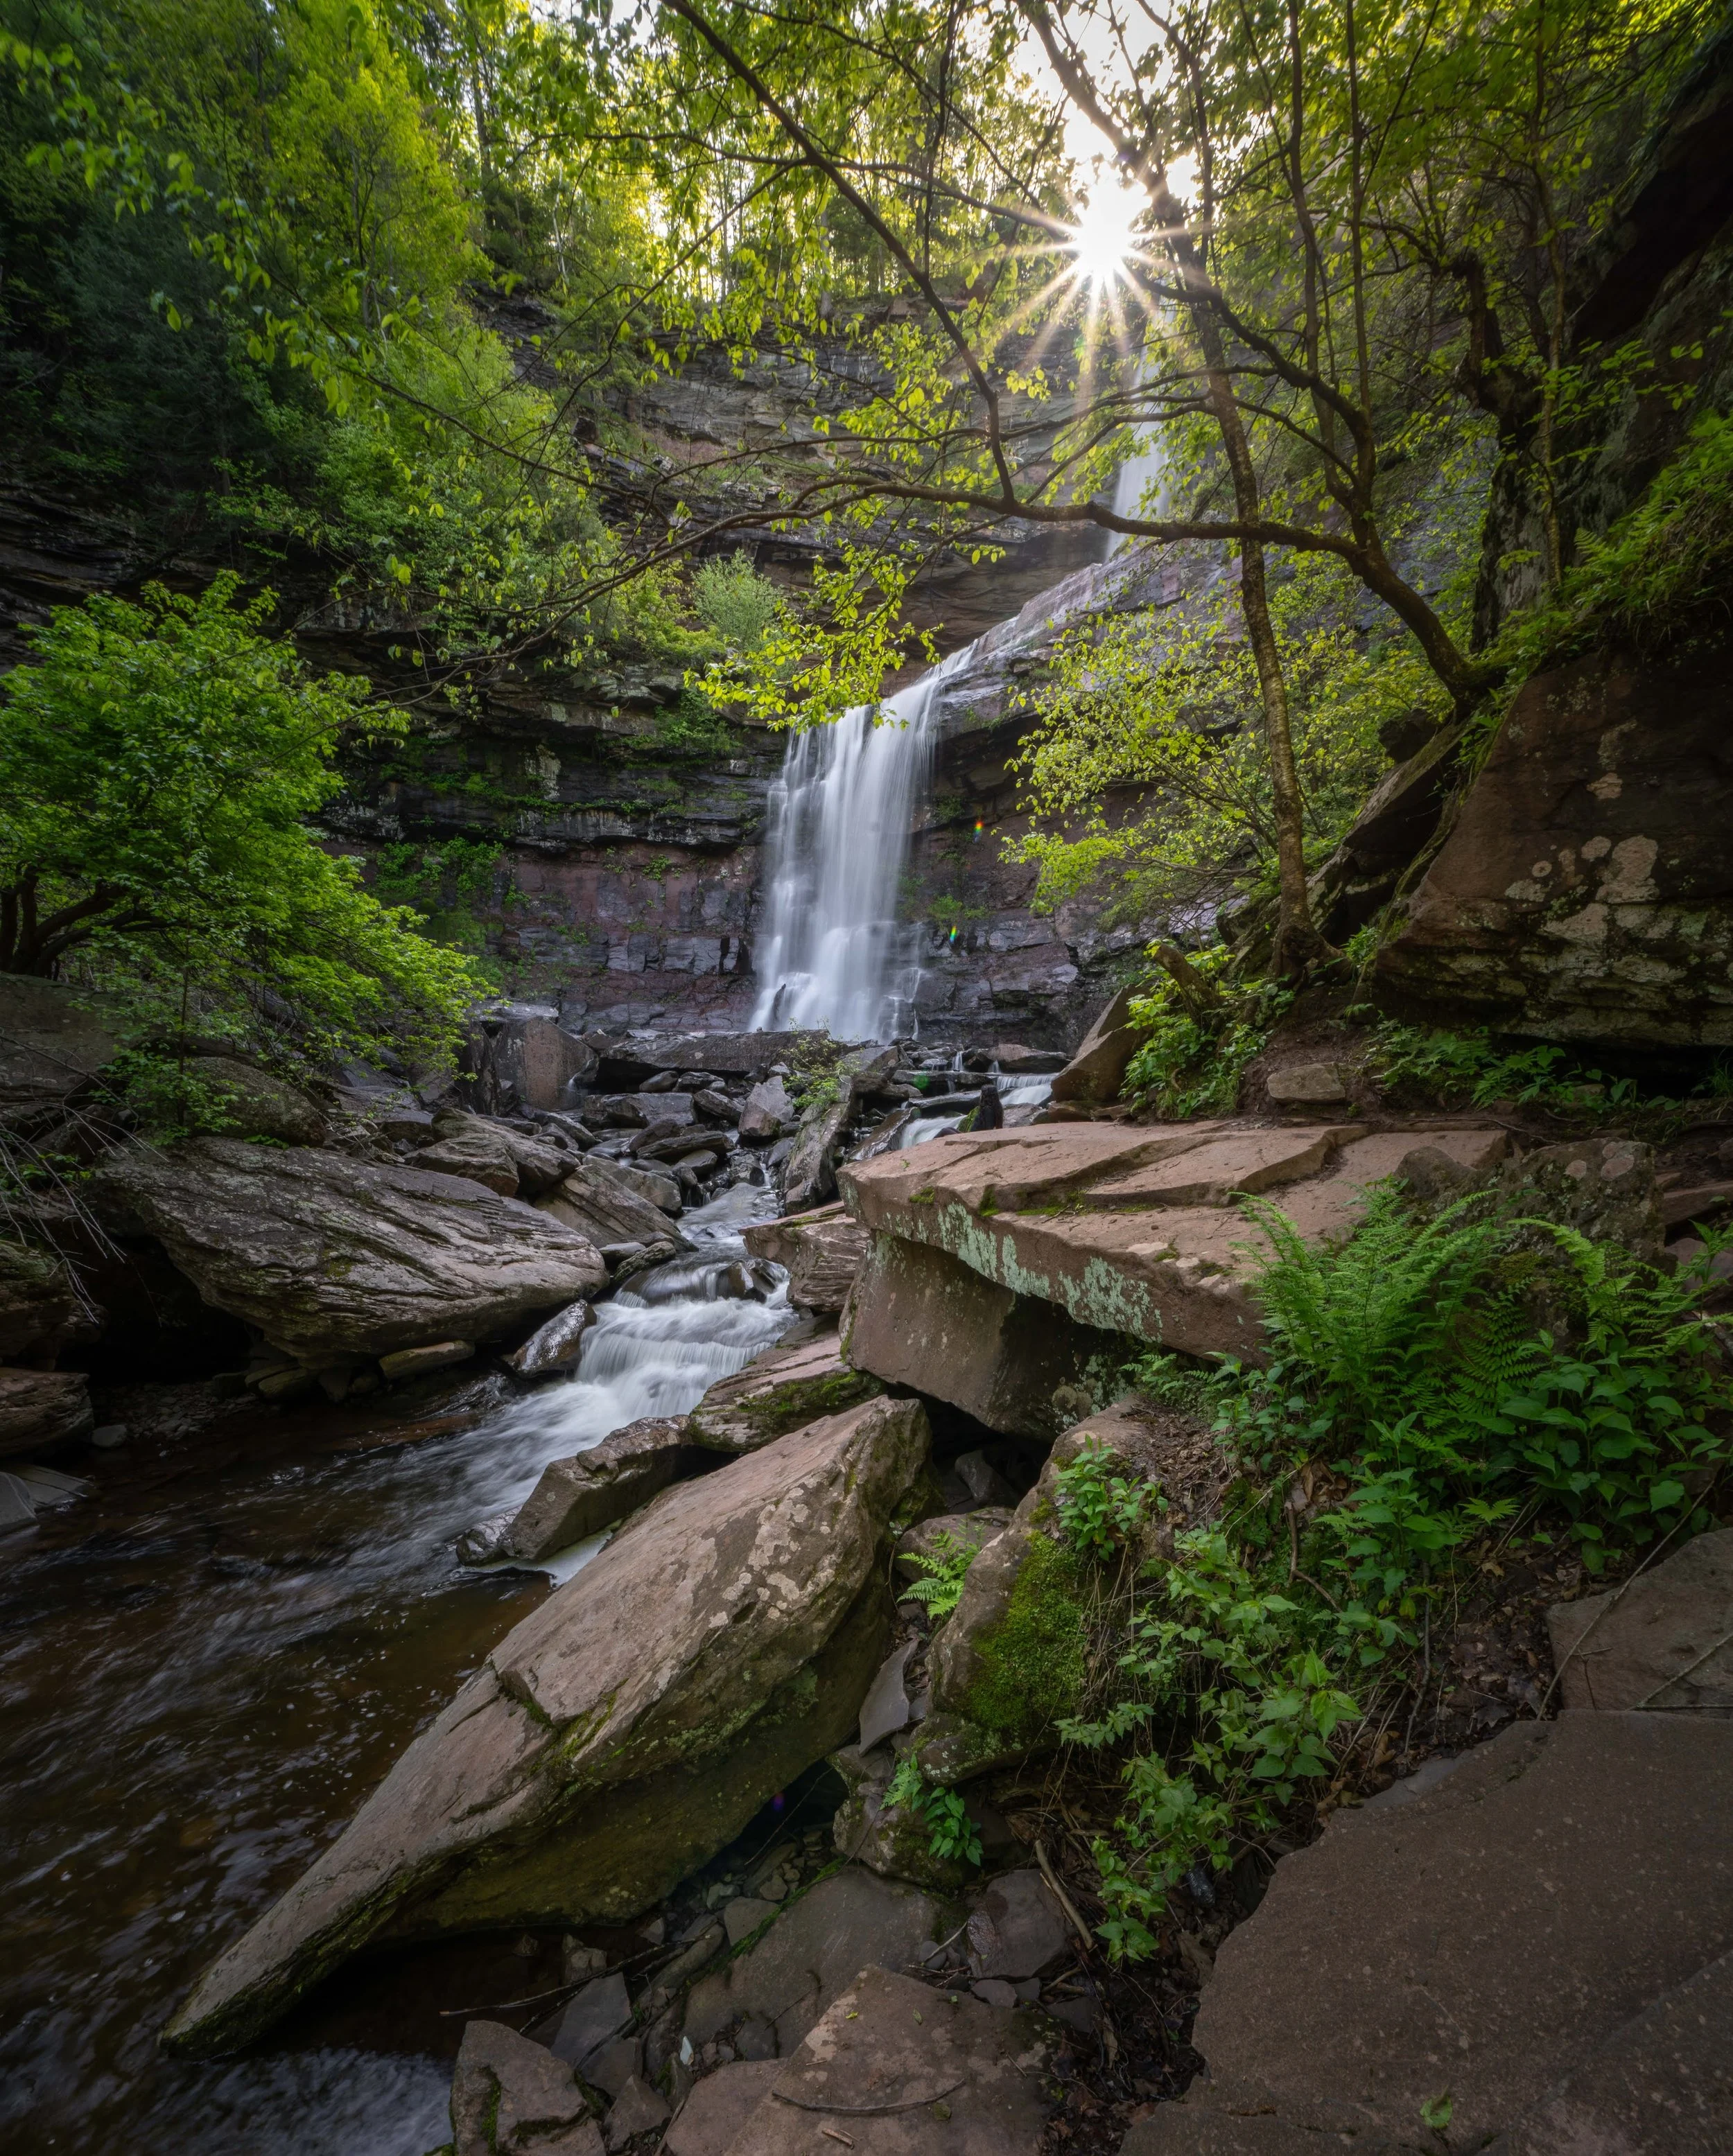
This photo, featuring a flared sun star, was taken at Kaasterskill Falls in New York state.
Glass - “Glass” is slang for “lens.” If someone says, “That’s some big glass,” they’re referring to a large lens- usually a telephoto.
Grad Filter - Short for “graduated filter,” this is a type of filter that’s darker on one side and lighter on the other. It’s used to balance exposure, often for skies in landscape photography. More information can be found about these in the Filters tutorial.
Halo - A halo appears when you're editing around high-contrast areas, like the horizon line. It usually happens if you over-sharpen or over-process your photo, but it can also be the result of lower quality lenses. You can fix halos easily with Healing tools.
HDR (High Dynamic Range) - This stands for high dynamic range. It’s a process where multiple exposures are blended together to capture detail in both the shadows and highlights. Some cameras and phones can do this automatically. While it can be convenient, manual exposure blending gives you more control and a better result, which I cover in detail in the Sky Blend tutorial.
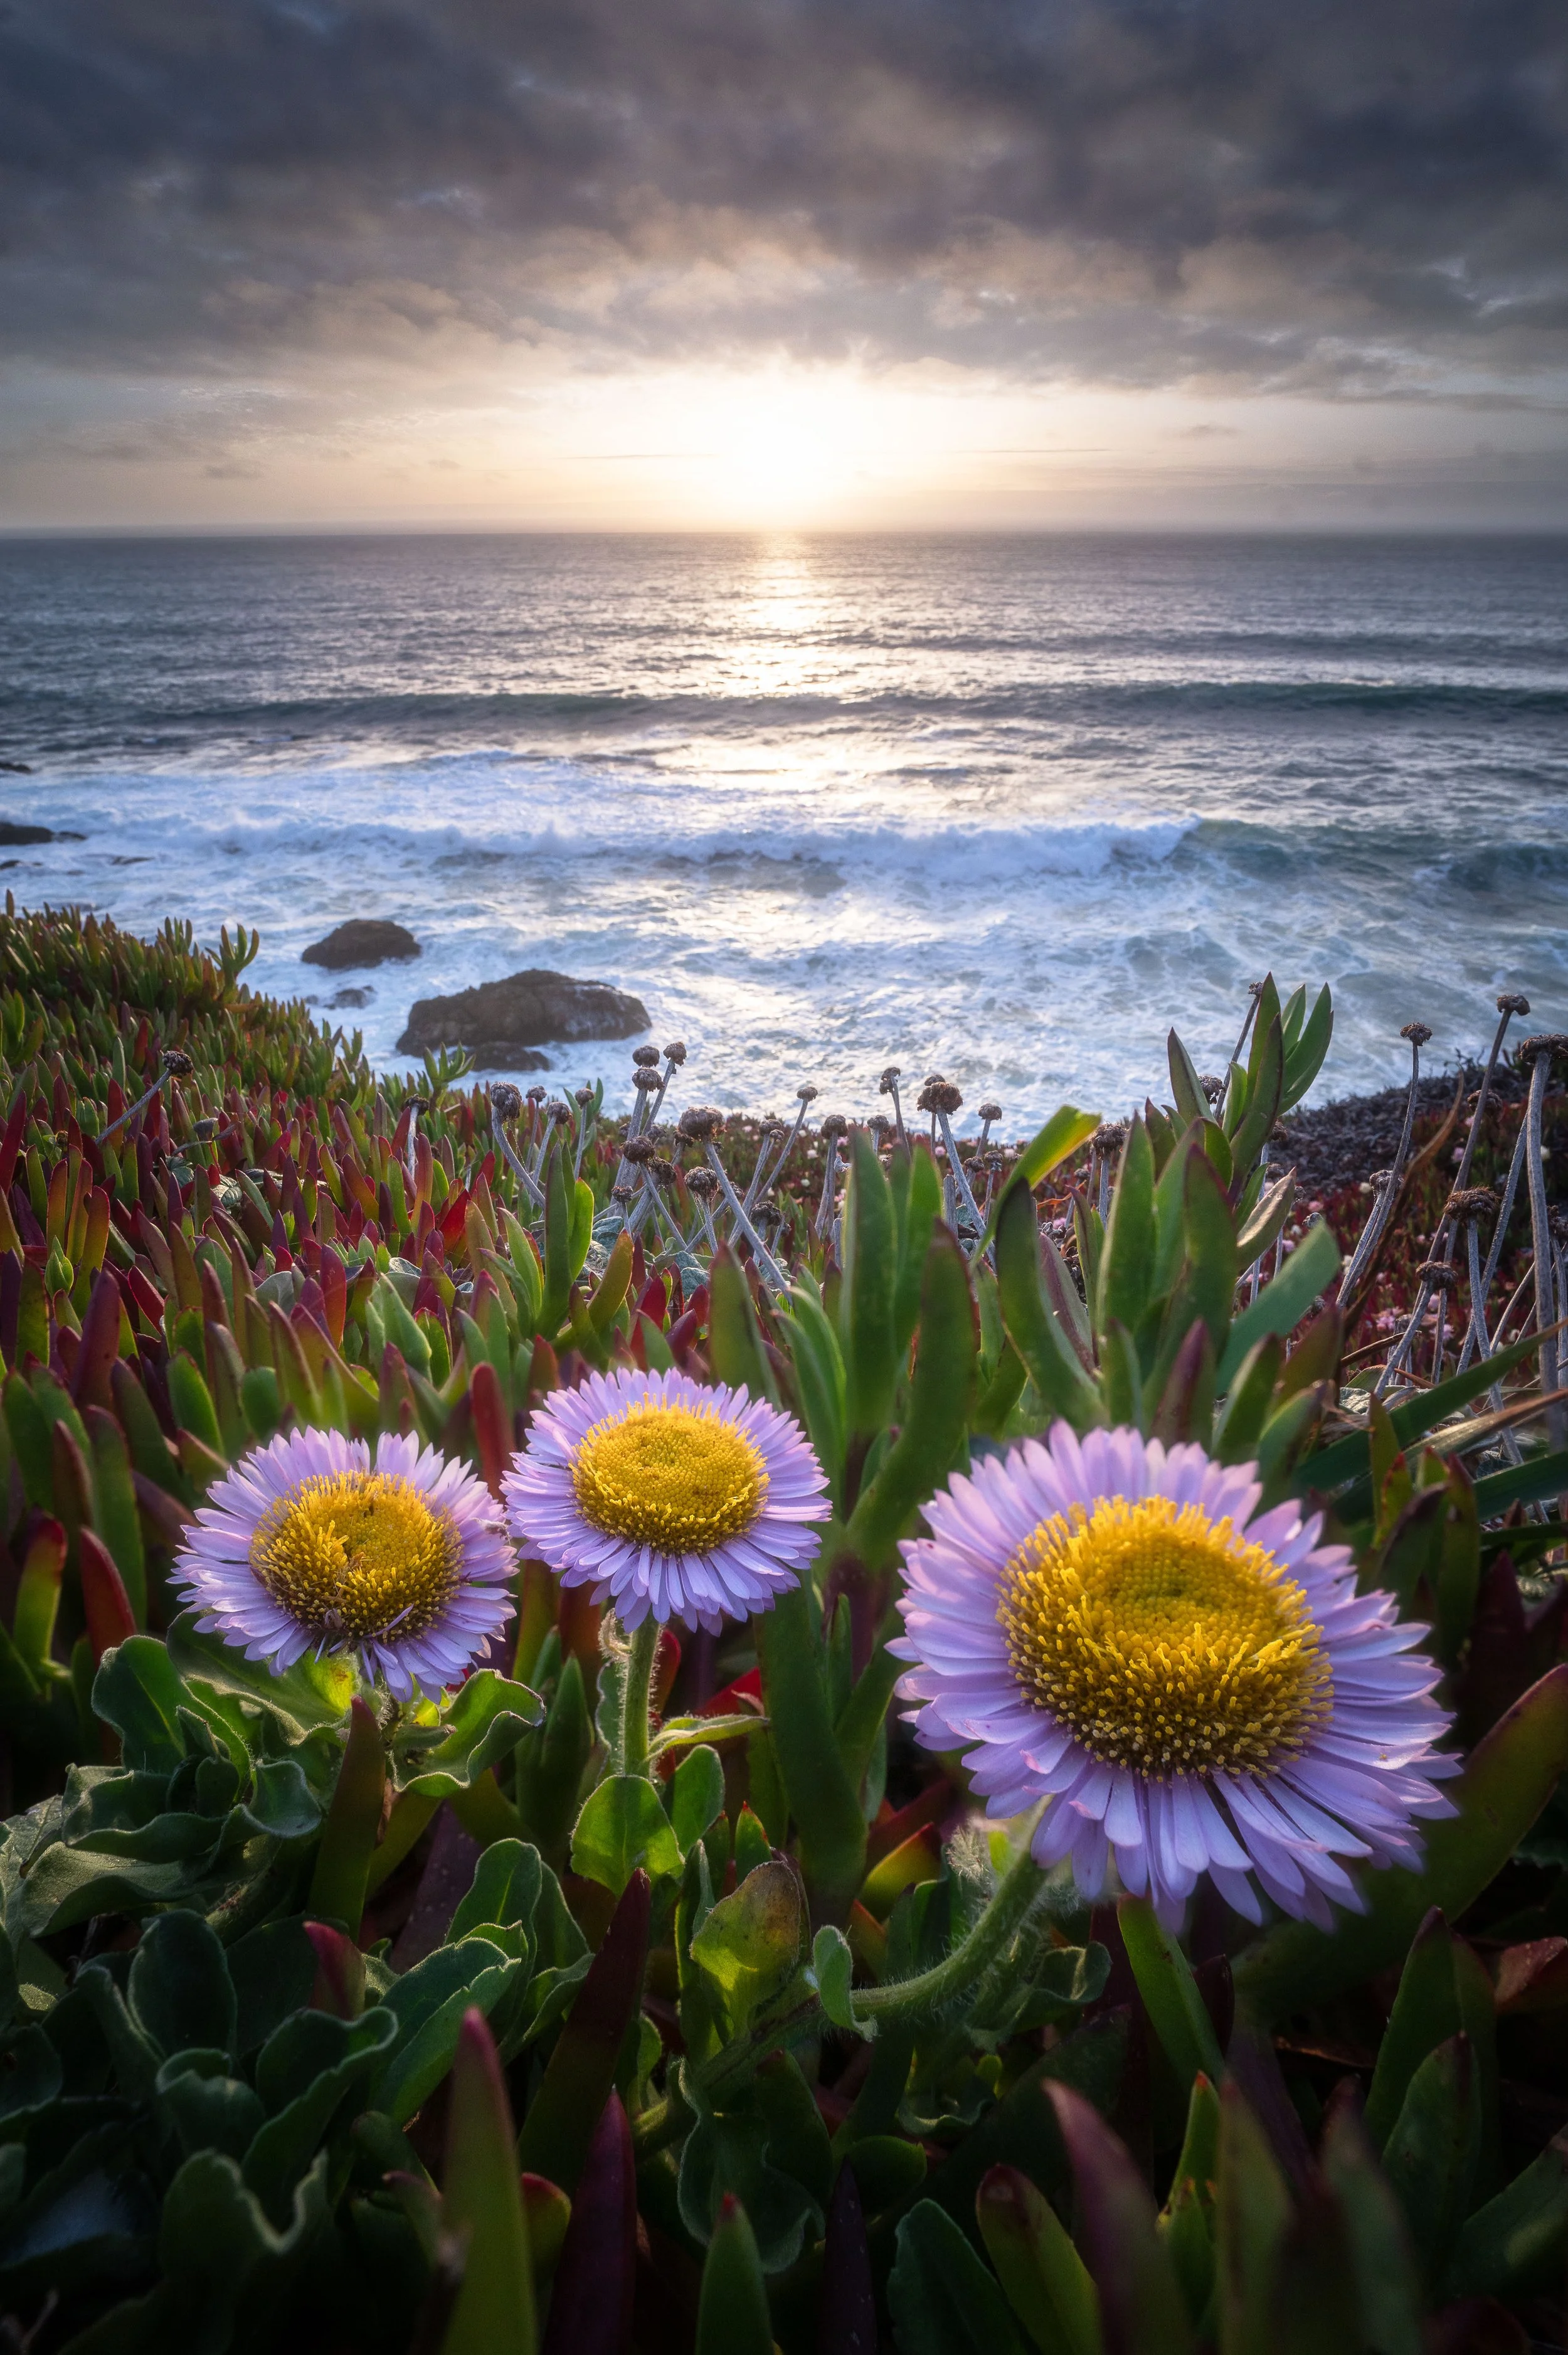
This photo, taken at Montara Beach in California, used an Exposure Blend to combine the dynamic range of the sky and the flowers.
Hot Shoe - This is the metal mount on top of your camera that you can use to attach external gear like a microphone or flash. Be careful not to get it wet, as it has electronic contacts. Most cameras come with a small plastic cover for it.
Low Key and High Key - These terms describe lighting setups. “High key” means there’s a lot of light in the background, while “low key” means there’s very little light or it’s dark. These terms are more common in portrait photography and video production than in landscapes.
Metering - Metering is how your camera determines the proper exposure for a scene. Back in the film days, photographers used handheld light meters, but now cameras do this all automatically. There are several metering modes:
Matrix - The default mode that averages exposure across the frame.
Center-Weighted - Focuses on the center of the image, useful for portraits where the background might be bright.
Spot Metering - Meters based on your focus point, good for moving subjects like birds.
Highlight Priority - Prevents blown-out highlights by prioritizing the brightest parts of the image.
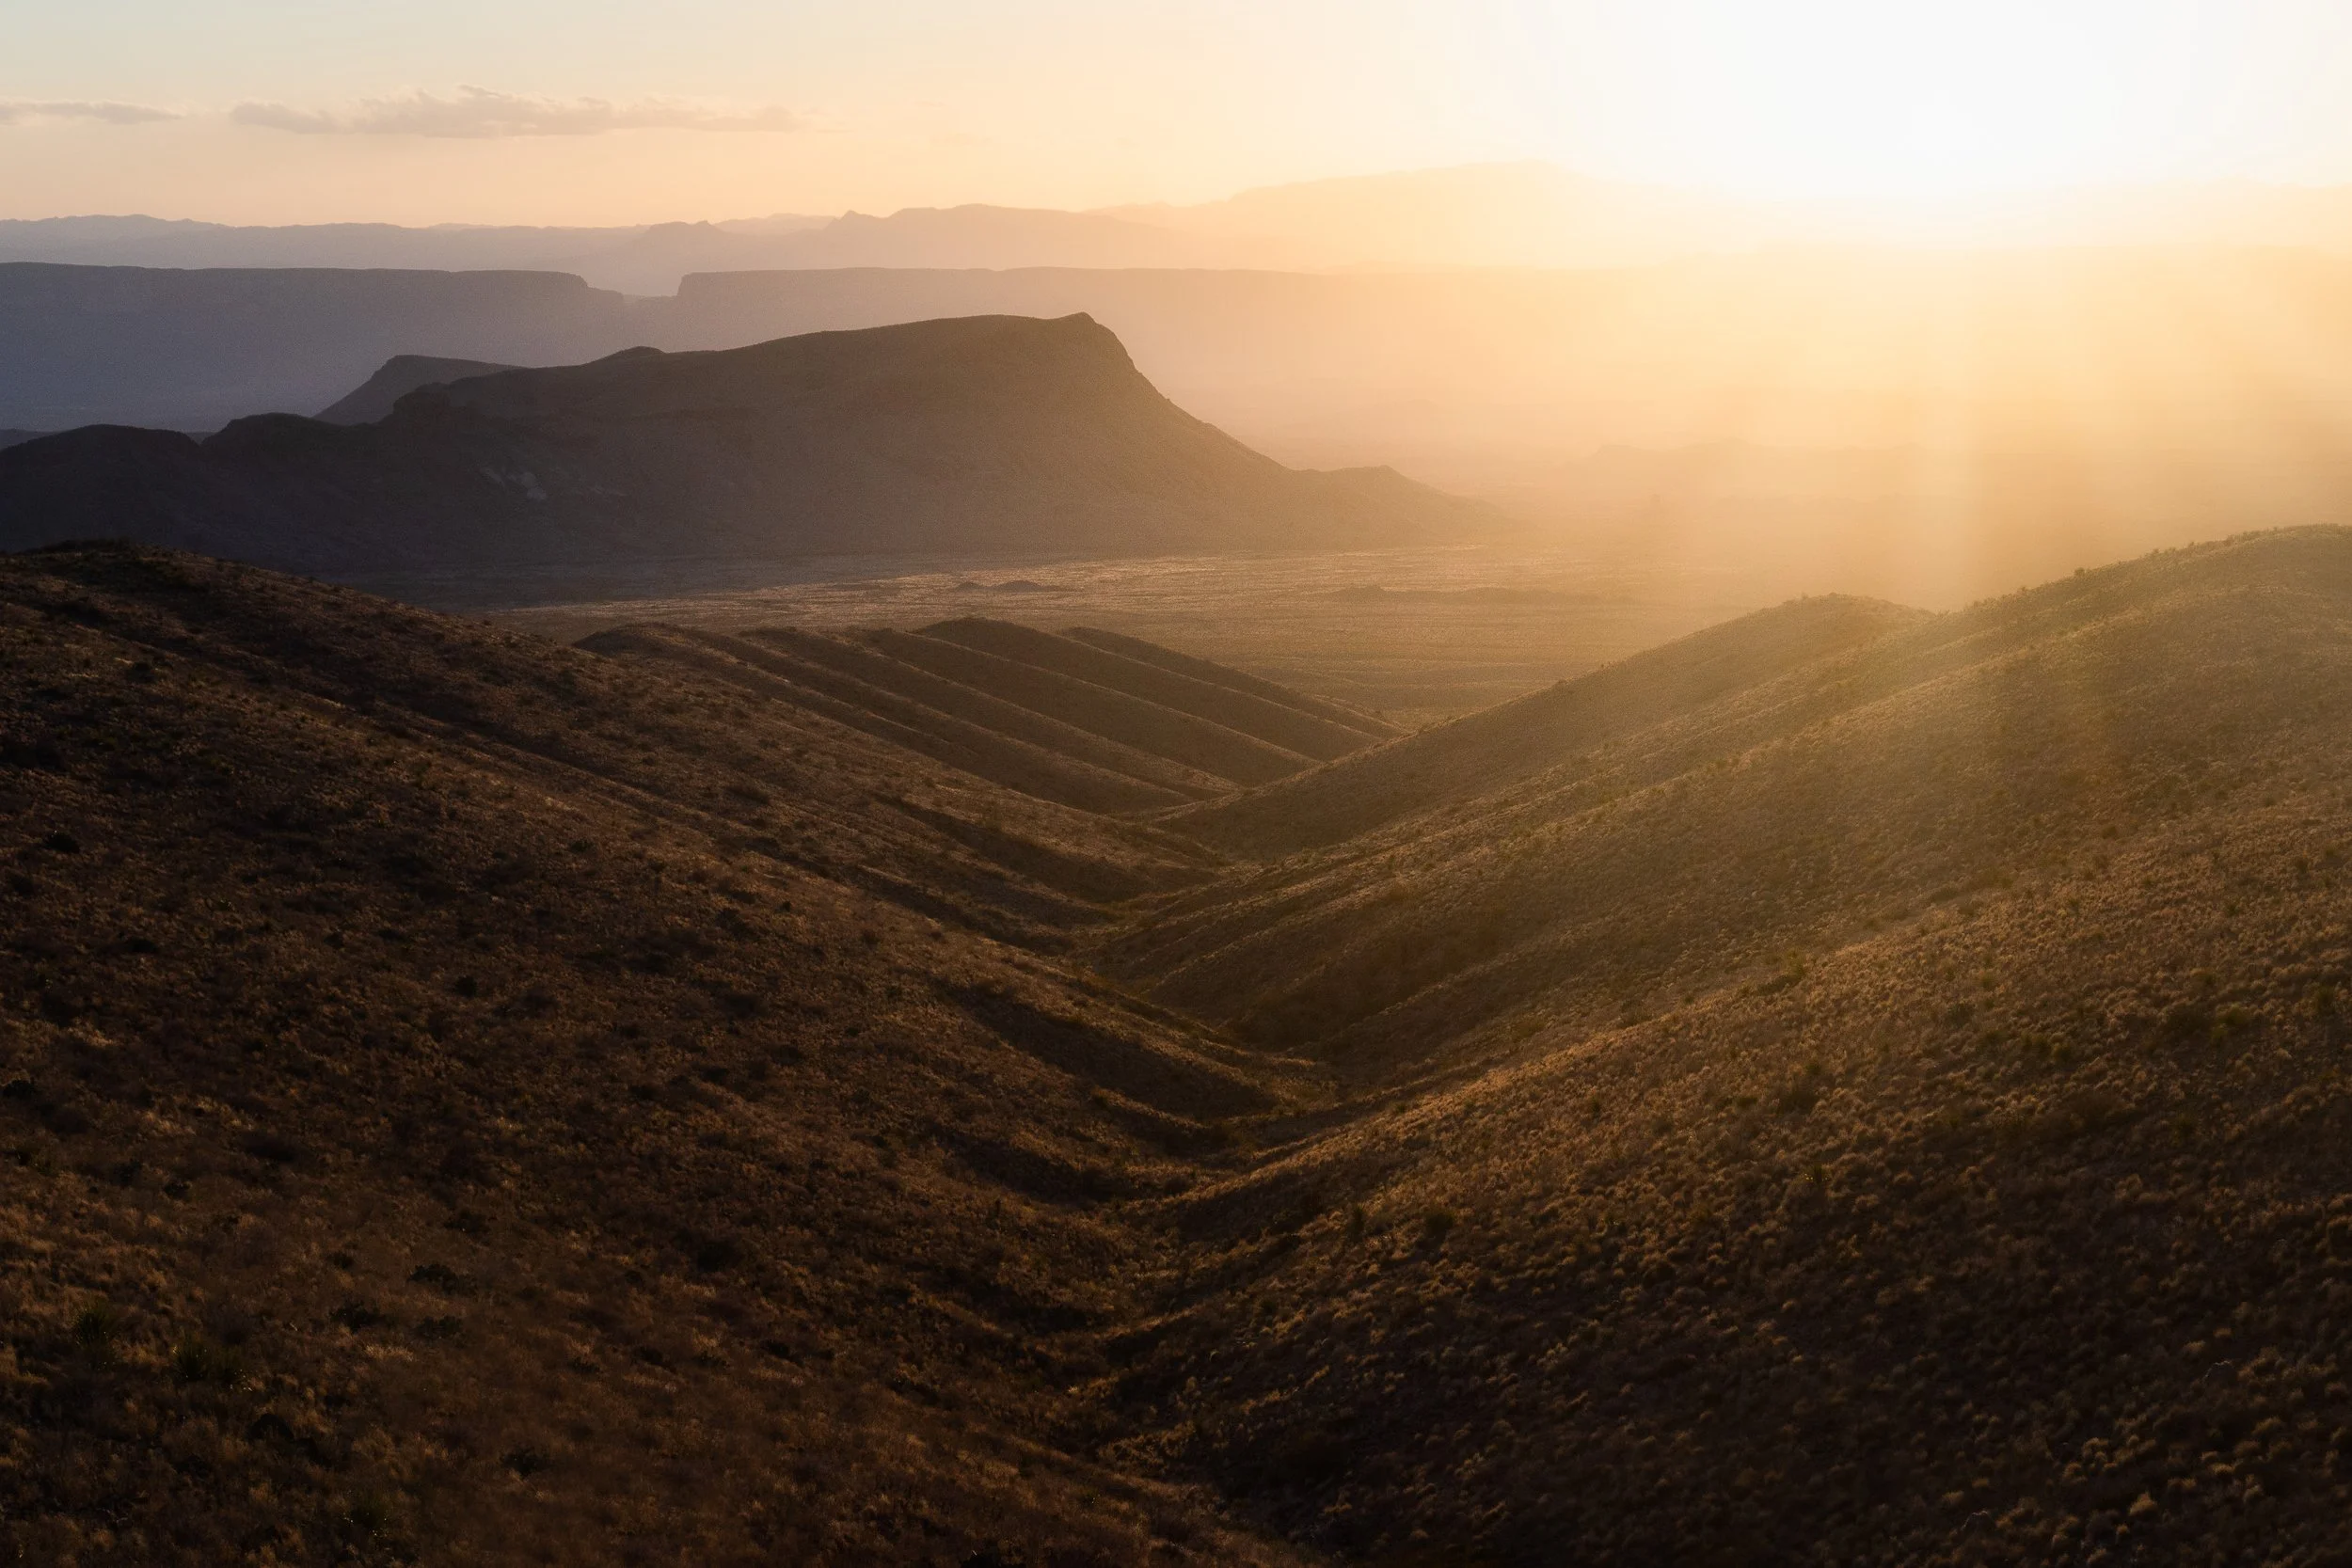
This photo, taken at Sotol Vista in Texas, would have been a metering nightmare back in the day because of the intense highlights and shadows. Thank god for modern technology.
Muddy - This refers to colors that look dull or blended together, often from too many overlapping tones. Usually this is the result of over-editing a photo, or of a poor composition with little contrast.
Nifty Fifty - Slang for a 50mm lens, usually with an f/1.8 aperture. This lens is considered one of the best all-around prime lenses- it’s great for portraits, landscapes, and general shots. If you decide to dabble in prime lenses, pick up one of these first. It’s small, light, and usually fairly cheap.
OVF and EVF - These abbreviations stand for “Optical Viewfinder” and “Electronic Viewfinder.” Essentially, it’s what you look through on your camera when composing a shot. OVFs are found in DSLRs and show you the real scene in front of you using a mirror. EVFs, found in mirrorless cameras, show you a digital preview of the exposure.
Pixel Peeping - This refers to zooming way in on a photo to look for flaws like noise or lack of sharpness. Pixel peepers are often overly critical viewers. In my opinion, photography is about story and emotion, not technical perfection. (Although you should always strive for perfect technique if you can.)

Yes, if you zoom into this photo of shipwreck taken at Castro Point in California, you’ll notice a lot of grain. But for the love of god, stop pixel peeping.
Retouching - Common in portrait photography, retouching refers to editing skin tones, removing blemishes, smoothing pores, and enhancing facial features like eyes and lips. It’s basically just a term for editing, with a focus on people.
Run and Gun - This means shooting quickly with a lightweight setup. You might hear someone say, “I’m just going to run and gun this shoot,” meaning they’re using minimal gear- no tripod, no heavy lenses, just a fast moving camera capturing moments as they happen.
Spray and Pray - This refers to firing off a bunch of shots in burst mode without much composition, hoping one turns out well. It’s often used in fast-moving situations, or bad weather when visibility is poor and you can’t look through the viewfinder. It’s not an ideal technique, but sometimes it’s your only option.

This photo, taken at Pemaquid Point in New England, was taken in harsh, rainy conditions. I had to setup the camera in a wet bag and blindly focus, hoping to get the shot.
Straight Out of Camera - This means the photo hasn’t been edited yet. If you show someone a shot and say, “This is straight out of camera,” it means the photo hasn’t been edited yet, so don’t judge it to completion!
Conclusion
Alright! Those are all the slang terms that I can think of. Now you’ll be able to hold your own in almost any photography conversation and sound like a competent photographer.
Let’s hop into the next tutorial, where I’m going to cover photography Preservation!